|
EQUINE CLICKER TRAINING..... using precision and positive reinforcement to teach horses and people |
 |
|
The
following clinic reports are all on this page. You can start reading
at the top and go in order, or you can skip to any particular clinic using
the following links:
A Clinic Report: April 29-30 Alexandra Kurland Clinic
at my farm
Alexandra Kurland Advanced Clinic: Groton NY: May
27-29 2006
Alexandra Kurland Advanced Clinic: Groton, NY: August
2006
Alexandra Kurland Advanced Clinic: Groton, NY:
October 2006
Alexandra Kurland Advanced Clinic: Groton, NY: April
2007
Alexandra Kurland Advanced Clinic: Groton, NY: July
2007
Alexandra Kurland Advanced Clinic: Groton, NY: October 6-8, 2007
Alexandra Kurland Advanced Clinic:
Groton, NY: July 19-21, 2008
Alexandra Kurland
Intermediate/Advanced Clinic: Elverson, Pa: Sept 20-21, 2008
Alexandra Kurland Advanced Clinic:
Groton, NY: October 11-13, 2008
------------------------------------------------------------------
A Clinic Report: April 29-30 Alexandra Kurland Clinic at my farm.
(this report was posted on clickryder on 5/3/2006) Hi
everyone, I wanted
to write a brief report on the Alexandra Kurland clicker training clinic at my
farm this past weekend. I think we all had a great time and there was a lot of
positive energy and great ideas being shared. We started
on Saturday morning by going around the circle of chairs and introducing
ourselves. It was quite a diverse group with everyone from experienced clicker
trainers to some people who were just getting started. I always enjoy this part
of the clinic as it is so interesting to hear what people are working on and how
they got started in clicker training. The circle always leads to some
interesting discussions. There were discussions on how we use clicker training
with horses compared to traditional handling, and how clicker training with
horses is different than with some other species. Alex explained how she views
pressure and release as compatible with clicker training and how she likes to
think of clicker training as a large umbrella that can incorporate many training
techniques. If you make clicker training too narrow, you can make it too
limiting. After
lunch we started to work with the horses. Alex explained some helpful tips for
starting targeting with new horses. She recommends that people count out a
limited number of treats (20 or so) and work in little sessions. Between each
session, you reload and give you and your horse a little think time. By limiting
the number of treats, it gives the trainer a chance to evaluate how the session
is going and adjust the training plan if needed. Alex also talked about how
targeting will show you which foundation exercise should be taught next. A horse
that is crowding during the targeting should have backing as the next lesson.
Alex showed us how you can start to incorporate backing into the targeting
lesson by feeding the horse behind the stall door. One point Alex made was that
targeting is simple, but that there are a lot of important little details about
food delivery. If you start to pay attention to those details when you first
teach targeting, it will teach your horse to be polite about food from the very
beginning. We worked
on targeting and the grownups are talking with the next two horses and they were
an interesting contrast so we saw how the same exercises helped both a fidgety
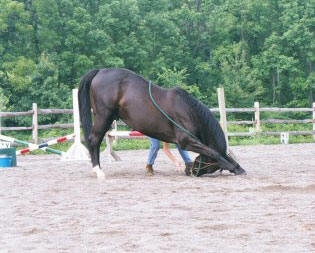
horse and a very polite, but less enthusiastic horse. We ended the day with
demonstrations of the lateral work with my two horses Willy and Rosie. Earlier
in the day Buster, the mini, got to do a little show too and demonstrated a few
tricks including sitting on his bean bag. Sunday we
started off with the training game. We had a lot of fun playing both versions.
In the first version we chose a behavior to train and got to see how to shape
it. In the second version which was looking for creativity, we allowed the
trainee to offer many behaviors and then did our shaping based on the possible
behaviors that were presented. It was interesting to difference between shaping
with an initial goal and allowing the trainee to determine what behaviors could
be selected for further shaping. As a trainer it is important to be goal
oriented but as a clicker trainer, it is also important to keep the creative
juices flowing and the creativity version of the training game gave us all some
ideas for how to expand our horse’s repertoire even when we run out of ideas. We did a
shaping exercise with Red, my daughter’s QH gelding and Ellen taught him to back
up in his stall by free shaping from outside the stall. He was a bit confused
at first but once he figured it out, he was backing nicely and offering to stay
back even after the click. I experimented last night to see if he would do the
same backing in a different stall and he was great. Alex
guided us through a lesson working on a little tai chi and rope handling. She
wanted to show us how a tense rider or tense horse is not able to be light and
feel the changes in the contact of the rein. She also showed us how to use arm
rotations to stabilize our core strength and help become post like when the
horse tried to pull us out of position. We spent
the rest of the afternoon talking about the foundation exercises and mechanics
of backing in a square and head lowering and how horses learn to collect and
organize. Alex taught one horse and handler (Chester and May) how to practice
an early version of WWYLM where May walked him on a circle and stopped at each
cone, clicking for stopping and backing out of her space. After
that, I demonstrated some single rein riding on Rosie so people could see the
mechanics of riding on one rein, the triangle and two reins. We finished with
working two other horses on the cones in versions of WWYLM. The last horse
worked on walking energetically forward and then softening and we could see the
beginnings of lateral work coming out of the exercise. At the end
of the day, those of us still here got to see Alex work Chester through some
trailer loading issues. It was great to see a horse calmly and consistently
trained so that he got on and stayed on the trailer when he was comfortable with
it. At one point, they wanted him to back off and he was asking if he could
just stay on. I am sure
I missed lots of details in this report as I was in and out tending to clinic
details but I think Alex did a great job working with a group of trainers of all
levels and interests. While most of the exercises we did with the horses were
pretty basic, it was good to go over some details that can make a difference and
show people why it is important to be detail oriented and consistent in even the
first lessons. We had lots of discussions about more advanced topics and how to
apply clicker training to work beyond the foundation lessons. I think
most people got some practical advice and new skills for the level at which they
are currently working and got some new ideas for where they are going. We were
lucky enough to have great weather and I really enjoyed getting to meet lots of
new and interesting people. I also enjoyed seeing how Alex is constantly coming
up with new ways to help people get started correctly and the changes in the
horses.
A clinic report: AK
Advanced Clinic at Groton NY: May 27-29, 2006 Hi
everyone, I am just
getting organized again after another great weekend clinic with Alex in Groton,
NY. In past clinic reports, I have shared some of the key points and details of
the lessons we worked on with the horses. But, for some reason, I feel that this
clinic experience does not lend itself to that kind of format. There were lots
of technical details that we worked on and we did do some of the same basic
exercises with several of the horses, but I think that the underlying theme for
the clinic was one of teaching balance and how training develops horses and
riders who can really communicate. This goes beyond teaching the horse that leg
means forward or a raised whip means stop. It became a kind of dance both on the
ground and under saddle where the rider could give one “cue” and have it mean
one thing and minutes (or even seconds) later, use the “same” “cue” and have the
horse respond differently. But I am
getting ahead of myself. This clinic was hosted by Kate Graham and Lin Sweeney
at Lin’s beautiful farm in Groton, NY. They have hosted a series of clinics for
6 years and there is a core of advanced clicker trainers who attend most of
these clinics, with the occasional addition of other new clicker trainers and
some other advanced trainers who come when they are able. For various reasons,
this clinic was very small, but that made it all the more interesting. We had
the time to explore some exercises that Alex has not done in depth at previous
clinics. BALANCE
BETWEEN TWO WHIPS I arrived
slightly late as everyone was heading up to the round pen. Alex wanted to start
by introducing us to liberty work and work between two whips. We had a session
on round pen work a few years ago, and we have touched on liberty work here and
there. The focus for the morning was to be working in pairs where one person
was the trainer and the other was the horse. Alex started with Kate and we
explored how to handle two whips (instead of one) and how to use the whips to
create flow instead of using them to block. The basic idea is that each whip
can be used to either send the horse or direct the horse, or redirect the horse
and the meaning of the whip can change back and forth each time it is used. So a
whip can be used to send a horse forward and out if it is used behind the horse
and can then be used in conjunction with the other whip to draw the horse in.
The interesting thing about this work is that it all becomes very subtle and it
is a question of the trainer reading and anticipating the horse and the horse
reading and anticipating the trainer. We worked
through a few people and got an idea of the footwork and whip handling needed to
work with two whips. In round pen work, Alex has us pass the whip behind so we
had to learn to pass it in front. We also had to learn to use the whips both
together and independently. At one point, I was being worked by Margaret and
Alex stepped in to demonstrate how to handle a horse (me!) that was backing off
from the forward whip. This led into a very long session where Alex educated me
about working in two whips. I am not going to go into great detail here, but if
you are ever in a clinic and have the chance to be the horse, take it. You will
learn a lot. A few highlights for me were: In the
beginning, as soon as she clicked, I looked away from her. I knew she was coming
to give me my treat (a pat), but I was mentally tired and had to disconnect for
a moment (how many of our horses do this?). There were
times when I was following the whips and not getting clicked and I found myself
thinking “wow, I could use a click to tell me what to do.” Sometimes that made
me more confused and I worked less hard. But other times I also had moments when
I had just been following the whips and I suddenly thought “I haven’t been
clicked in a while, maybe I should be thinking harder about this.’ I am not
suggesting horses are quite the same, but I do see in mine that they have
moments when they suddenly seem to try harder or fade out. I will have to think
about why I sometimes tried harder in the absence of a click and sometimes I
just sort of lost interest in trying to figure it out. I became
really fixated on the whips. Everything else became irrelevant. I have to say
that I never learned to like walking forward towards a whip, but I learned it
was what she wanted. At the end of the session, Alex had me so I was moving
forward through the inside turns and she could use either whip to cue me to go
forward or back. At one point, she was standing on the opposite side of the
round pen wiggling the whip in front of me and I was walking forward toward it.
She described this as being able to bring my hips up from in front, which is a
necessary skill for in-hand and liberty work. Through the course of the whole
session, interesting little pieces popped out. There was one point where I was
balanced between the whips in such a way that Alex could have reinforced and
taught piaffe. At another point, I was offering a lot of lateral work.
MORE ON
WHIPS, LEADING TO HOW TO BALANCE A HORSE BETWEEN FORWARD AND BACK After
lunch we got the horses out and started introducing them to the work on two
whips. Kate had brought her new horse. He is a rescue who has had minimal round
pen work and she ended up spending time teaching him to be less reactive to the
whip and reinforcing him for going out and forward away from her when she sent
him. He had a tendency to curl back around. Lin worked her horse Button who did
really well. With both horses, we saw how the use of the second whip could
really help the horse understand the handler’s direction and intent. It was nice
to see how the whips went from being a little scary to being accepted. With
Lin’s horse, we could start to see how the horse could interpret the second whip
as a cue to come forward, or to turn away. Lin was able to use the second whip
to turn Button or draw her in. If she was behind, she could use one whip to keep
her out and another one to keep her going the same way, so she was going
straight. It was a great demonstration of how you teach a horse to stay between
the aids without the horse getting trapped or anxious. Lin had a great time
ground driving Button and setting up turns and changes of direction. We had an
interesting contrast between Kate’s horse Tucson who wanted to curl up around
her too much, and my horse Rosie, who wanted to leave. Alex showed how we could
use similar exercises to help each horse. With Tucson, Kate had to be very
careful about her body position so she sent him out. With Rosie, I had to think
of adding a draw so that she would keep connecting back to me. In both cases,
the second whip was used to help balance the horse if there was a tendency to
over bend and circle around or leave. Sunday we
continued with the work between two whips. We worked each horse at liberty and
started to feel the flow of sending them out and around, and how we could use
the whips to draw them forward and turn. Some people also experimented with
using the whips from behind so that they were ground driving their horses
between the two whips. This led to a discussion and further understanding of
how to use your outside aids and how important it is to ride both sides of your
horse. With the RP work and single rein riding, it is easy to get fixated on
inside aids, but we could see how you could get a really nice turn by using the
outside whip. In my
ground work session with Rosie, we worked on getting her connected to me by
using a draw in the liberty work and with the feeding. This had to be balanced
with asking her to back to get her food. When I first turned Rosie loose in
the indoor, she was very distracted and would stop for her click but leave as
soon as I fed her. Sometimes she would be slow to come get her treat after I
clicked. Alex had me start by walking next to her and drawing her in. We built
on yesterday’s session where she would get multiple clicks for standing while I
stroked her and waiting for me to send her out. It was very clear to me that
when I was in physical contact with Rosie, she would stay mentally connected,
but that as soon as I tried to add some distance, she would lose her focus.
Alex’s goal was to teach Rosie that she needed to keep track of me. A key point
for me was realizing that Rosie was paying attention to me even when she didn’t
seem to be. Bob had pointed this out earlier with Button. He noted how she
didn’t look like she was paying but she was clearly being directed by Lin. I
noticed with Rosie that even when I thought she had tuned me out, she would
still react to a draw and I could get her back by backing away from her, instead
of going after her. Using a draw works nicely because the horse does not have
the feel of being pressured. So I used
a draw to get her to come to me to get her treat. If she was getting good at
the draw and starting to stay with me, then I would ask her to back out of my
space, and click for keeping her distance. Then I would draw her back in again.
I kept going back and forth, using the food delivery and the behavior I clicked
to get her to stay connected with me, but not on top of me. It was really quite
dramatic to feel the change in her. She went from having a moment of focus and
then disconnecting, to being really connected with me. It might seem confusing
to a horse to have someone asking the horse to come forward and then back and
clicking for both, but these were behaviors Rosie knew well and I had clear cues
for them. So she did not get frustrated, it just made her pay attention more.
After she
was connecting better, I started experimenting with using the second whip. It
gave her more direction and I could use it to catch her attention when she
started to wander. This brings up an important point that Alex stressed. When
doing the liberty work, Alex will wiggle one whip to get the horse’s attention
and show the horse which is the active whip. The wiggling is not threatening, or
asking for more forward. It is just saying “hey, watch this whip.” You don’t
want the horse to be running away from the whips. You want the horse to be
watching them. When I was being worked by Alex on Saturday AM, I found a raised
and static whip to be more threatening than a lower and gently wiggling whip.
The gently wiggling whip caught my attention and made me watch it, but I didn’t
have the immediate desire to move away from it. This comes from the motion of
the whip and also from Alex’s intent. It reminds me a bit of playing with a cat
toy. If you wiggle a string at a cat too hard, they will leave. You have to
just move it enough to catch their eye and interest and make them want to see
what is going to happen next. It even helps to wiggle, hesitate, wiggle. BALANCE
BETWEEN THE WHIPS LEADS TO BALANCE BETWEEN THE AIDS: INSIDE/OUTSIDE AND
FORWARD/BACK, WITH A LITTLE LOOK AT PHYSICAL BALANCE (FEET) The ground
work flowed nicely into the riding work. Kate worked with Tucson on some basic
single rein riding. She had only ridden him a few times (he is 11 and had been
ridden a lot before she got him). This session was short as Tucson’s feet
needed attention and he was uncomfortable under saddle. Even in his basic work,
the question of balance came up. Can you ask a horse to organize and be balanced
in his body if he is not balanced in his feet? Alex decided the answer was “no”
so we worked a bit and left him to process. Lin and I
worked on shoulder-in with our horses. Shoulder-in is itself a great balancing
exercise because the horse has to learn to rock back and collect, but also to
keep the energy going. In my lesson, I worked on riding a square in
shoulder-in. If Rosie set herself up nicely in shoulder-in, I was to ask for a
trot in shoulder-in. This is really hard slow, work. Rosie figured out pretty
early that she would get clicked for trotting so she would offer that before
confirming the shoulder-in. The nice thing was that because she was thinking
“trot” I was able to keep the energy up in shoulder-in. When she was really
good, I could feel the very deliberate and precise placemen of her hind feet. An
interesting feeling because she was slow but she didn’t feel stuck or sucked
back, just like she was working hard and carefully. We
continued this lesson on Monday with some nice results. One thing that started
to evolve was my connection with her through the outside rein. The outside rein
connection is a fascinating feeling. If the horse is in the correct balance, you
can use the outside rein in different ways to get different results, but you can
also use it in almost the same way to get different results. It all depends upon
the balance point of the horse. In the RP work on Saturday, Alex talked about
finding the pivot point of the turn. If you get in synch with the horse and the
horse is light, you will find that you can stand in one spot and shift your
weight and horse will go from turn to turn. This evolves over time. In the
beginning you have to walk around and change the whip from hand to hand to get
inside turns. Then you will find that as you can work further away from the
horse, you are taking fewer and fewer steps between turns. Then you realize
that you are not moving your feet, just the whip from side to side to get the
turns. At some point, you realize that you can get the turns without the whip,
just by using your body and weight shifts. You are on what Alex calls “the pivot
point” and the turns are easy and flowing. The
outside rein under saddle is a bit like that. If Rosie is really up and balanced
in her body, I can open the outside rein to ask her to move her shoulders over
and out. I can also open the outside rein to move her shoulder in and have her
rock back and engage as she turns. Alex describes this as using the outside
rein with your seat as a pivot point. I have had Alex describe this before and
have been able to get a turn off the outside rein, but it is usually by closing
the rein towards the horse’s shoulder. This was the first time that I really
consistently could feel how the horse could turn in off the opening outside
rein. I should add that the horse does not flip the bend when you do this. It is
like getting a step of a walk pirouette. Why does
this work? I’m not sure I can explain it. It just evolved out of the single rein
work and is now available to me. Alex says she has a hard time explaining it to
people because it is so counter-intuitive. All I can say is that it is a really
amazing feeling because it feels like sitting on the hind quarters of the horse
and having the horse lift you up and turn. After I
rode, Lin worked through the same exercise with Button and I was able to see how
she was building the connection through Hip Shoulder Shoulder and having Button
light to both the aids to go forward and back. It comes back to balance. Unless
you can get the weight shift as the horse rocks back and keep the energy ready
to go forward, the shoulder-in off the outside rein doesn’t come. I should
add that Tucson was trimmed on Sunday night and we watched him go again on
Monday AM and he was clearly walking with more energy and balance. The feet
matter. I think we
all left with some great ideas for things to work on, and a real understanding
of how work in one area (RP or liberty work) ties in directly to riding and how
every exercise has components that both need to be kept in balance and teach the
horse about balance. At one point I was asking Alex about how my horses seem to
get fixated on responding to one aid, or thinking that they know the right
answer. When I change so that they need to keep responding to one cue as I add
another cue or criteria, they seem to get stuck. For example, I have done a lot
of single rein riding. When I first pick up the outside rein, it is not uncommon
for the horse to try to give to the bit on the outside rein and flip the bend.
I usually go back and reconfirm the bend and then pick up the outside rein more
slowly and click for the pickup of the rein while keeping the bend. The horse
is learning to balance between the two reins and is learning that the meaning of
the pickup of the rein varies depending upon what else is going on. If I pick up
the outside rein first, then I do want the horse to bend in that direction. This is
just the horse learning to be flexible in his interpretation of the aids. It
goes back to the dance I described earlier where one rein has different meanings
and the horse has to learn to sort them out. What I realized after asking the
question was that there are lots of earlier exercises where the horse has the
opportunity to learn that the aids are flexible. Think of how the horse learns
when we want head lowering and when we want backing. They both come from the
lift of the rein, but the horse can learn when we want which behavior.
If we are
aware of the significance of some of these exercises, we can use them to make
sure that the horse understands about getting information from the trainer and
it will help the horse work through the beginning phases of understanding about
the balance of training. Even now when I am training, I sometimes ask for one
thing and then another and the horse really believes he can’t do both at the
same time. My job is to break it down so he realizes he can do both at once, and
now I will recognize and take advantage of moments when he starts to understand
and say “oh, yes I CAN walk and chew gum at the same time.” I am
always pleased to discover that my toolbox of basic exercises teaches lots of
different things. Just a little change in my focus can help a horse understand
a concept beyond the basic behaviors. Well, it
was a great clinic and I know I will be busy until August when Kate and Lin are
hosting the next clinic. If you have questions about details, I will be happy
to share more about what we did.
A clinic report: AK Advanced Clinic at Groton, NY: August 2006 Last
weekend, I attended the advanced clinic in Groton, NY taught by Alexandra
Kurland. I had a great time, as always, and thought I would share some of what
we covered, for those of you who cannot make it to clinics. I have been a
regular clinic attendee for 6 years now, and each clinic has been a wonderful
chance to see old friends, make new friends, and watch each horse’s progress in
addition to learning some new skills and refining those that I am already
working on. Alex is always working on coming up with new ways to present
material so that people can learn it faster and understand it better. The group
was a mix of clicker trainers of various levels. Although the clinics are
“advanced” clinics, there is still quite a range of experience both in clicker
training and just general horse knowledge. It makes for a nice weekend as we
spend some time working on more advanced concepts, but also time working on some
basic work. I enjoy watching the basic work as I always learn something new and
it is fascinating to see how each horse and handler learns and progresses. Saturday
morning was spent in a discussion of what people had been doing and then Alex
shared with us some of the important details that she had learned from her
marathon clinic session in England. Much of this has been covered in her
recent posts about arm rotations and accessing core strength so I am not going
to go into detail about it here, but we spent some time in the indoor doing
exercises to work on shoulder and arm rotations. One of the
exercises we did was the one called “flying” which is in the riding book (p.
145). We accessed a nice shoulder rotation through this exercise and then
released our elbows down to our sides. Then we tested each other to see how
stable we were when someone pushed or pulled on our hand. Our goal was to be
able to use our arms (align them) in such a way that we could access our core
strength and not use muscle to resist a pushy horse or a horse that was pulling
on the reins. We also experimented with unfolding our arms (as Alex has
described for treat delivery) and using the power from unfolding them to rock a
pushy horse back. The final
exercise we did was to walk the pre-WWYLM game in pairs where one person was the
horse and the other was the handler. We were comparing and contrasting how it
felt when the handler pulled the horse along with her arm vs. when she walked
and used her core. This was a great exercise and you can try it at home with a
partner. Set up a circle of cones or somehow mark the path of a circle. Take a
lead rope and hold one end, giving the other end to your “horse.” Before you
start, instruct your ‘horse” to be a bit sticky about leading. Not refusing to
go, but not going eagerly either. You are
going to start walking off as you might normally do when leading a horse (most
of us hold the lead in two hands, with one closer to the horse’s halter) and you
should be able to feel some reluctance in your horse, which makes you end up
doing some pulling. You will walk to each cone, stop and click/treat. Rock the
horse back and feed it in the position where the perfect horse would be and then
continue on. After 3 clicks, you can do a change of direction and go the other
way. Repeat this a few times and then evaluate your horse. Is he leading more
freely? Is he stopping well for the cones? Is he in the correct position when
you feed him? Now, you
are going to change your leading technique. Instead of holding the lead in two
hands with one out toward the horse, you are going to start in the GROWNUPS ARE
TALKING position (lead held over stomach with both hands over the top). You are
going to start the horse off by just walking forward and you are going to keep
your hands right in position so that you are essentially leading the horse from
your core. If the horse is a little sticky, you can think of firming up the
side closest to the horse, or even rotating slightly away from the horse to
adjust the feel on the lead. There
should not be a feeling of dragging the horse along, but of walking with intent.
In this scenario, the horse still gets releases (he gives them to himself by
walking freely) but he should have the feeling of being connected to something
very solid that just happens to be moving out in front of him. It is the same
idea as being a post, you are just a moving post. This might make it sound like
the people were stiff and rigid, but that is not what happened. As pairs walked
around, you could see increasing harmony between the horse and handler and the
leading got softer and lighter. After
lunch, we brought the horses out one at a time. We had all been working on
slightly different things so this was a bit of “show and tell” combined with
feedback from Alex and suggestions for improvements and where to go next. It
was a great clinic to show the range of things one could do with clicker
training. Kim Cassidy brought Oisin and he was anxious about being in a new
place, so Alex showed her how to help him settle down. Sue and Arlene were
borrowing horses to practice ground work and single rein riding. One thing that
emerged from the afternoon was the importance of your hand position in the SRR
and how you pickup the second rein. So, Sunday
morning we spent working on mechanics of single rein riding. Using benches and
plastic jump blocks, we made two horses and Alex worked through the mechanics of
the single rein pickup and transfer to two reins, using me as the rider.
Remember how I said that Alex is constantly working on finding new ways to help
people learn SRR better and refining her technique? Well, the mechanics of the
pickup and transfer that we learned on Sunday AM are different than the
technique she presents in the book. I don’t want anyone reading this to get
totally confused, so don’t try to match up what I write here with the
description and pictures in the book. I have to
say that when she first started changing things about how I was doing, I thought
I had just gotten sloppy and she was cleaning up my mechanics. It wasn’t until I
got home and was studying the Riding Book that I realized that she had me using
different mechanics from the ones I originally learned. There are some key
differences in how we did it Sunday, and I think I understand why she has made
some changes, but I had to email her to see if she was teaching new mechanics or
we were just working on adding new details. The answer is both. For many
people who are new to single rein riding, they will want to start by following
the instructions in the book. But riding is not static and as you and your
horse get a better understanding of the basic mechanics, there are some
additional details you can start adding. The best
way to practice the single rein mechanics is sitting on your saddle (if you have
a saddle rack) and holding a set of reins. You reach down and put your buckle
hand on the reins, just gently scooping them up with your fingers. This is a
rounded motion and your wrists are soft. Your hand should have your knuckles
facing up and your inside hand will be resting gently over the top of the buckle
hand. As you pick the buckle hand up, your inside hand will be sliding down the
inside rein. In the past, this was a sequential movement where the buckle hand
lifted before the inside hand slid down the rein. Now you are really using both
hands at once, starting from the moment the buckle hand touches the rein.
The buckle
hand is going to move up and out to the side, as if tracing over the arc of a
ball and you will end up with your elbow seeded at your side and a slight
rotation in your shoulder. How do you know if you have the correct rotation?
One easy way to check is to have someone push on your hand to see if they can
make you use muscle to prevent your elbow from going out behind you. But you
can also check a few things about your buckle hand. If you are wearing a shirt
with a side seam, your elbow will end up in front of the seam. Your thumb will
be resting softly on the top of the rein and the joint on your thumb will be
pointing up. Your wrist will be in line with your forearm and your whole
forearm should feel slightly rotated so that you can see a little of the inside
of your forearm. I had a tendency to over-rotate and end up with too much
rotation in my forearm. It is also
important to make sure that you are not just getting the arm rotation from
rotating at the elbow. The rotation needs to start up in the shoulder. The best
suggestion I can make for checking this is to start by sitting with your forearm
in the correct position which means checking your wrist alignment and thumb. At
this point, don’t worry about the rotation, allow your thumb joint to be facing
up. Take your other hand and carefully reach across and hold your elbow so that
your thumb is on the inside and your fingers are around the outside, allowing
you to stabilize the joint. Now just experiment with moving your whole arm from
your shoulder by moving your shoulder up, back and down. There should be a
shoulder rotation that makes you feel as if your elbow slots in by your side and
your whole shoulder releases and settles down. When we were working on the
Helen House Horses, Alex did some shoulder releases on various people and it was
interesting to see how much your shoulder drops and really settles down when it
is rotated and released. Working in front of a mirror might be helpful if you
are struggling with finding the shoulder rotation. Let’s
leave the buckle hand and look at what the inside hand is doing. While your
buckle hand was sliding up, seeding the elbow, and finding its rotation, the
inside hand is sliding down and finding its own rotation. I found this one
easier to find, because you have a TAG point for both your wrist and your
elbow. The seeding your elbow and shoulder rotation are the same as with the
buckle hand, but instead of having your forearm raised, you are going to rest
your wrist on the horse’s side, below the withers, with your arm rotated so that
your pinky just touches the horse. To find the position of your wrist, let it
rest on the horse’s side so that your thumb is up and all the fingers are in
contact with his side. Then just slightly rotate your wrist so that only your
pinky is still touching. This is a small rotation because you don’t want to end
up with your fingers facing up. When you are first finding this position, it is
ok to just rotate from your elbow, but once you know where you want your forearm
to be, you will want to make sure that you are getting the rotation from your
shoulder. When you
practice the mechanics of the pickup, there are a few other body parts that you
need to monitor. We discovered that it is easy to arch your back when you try
to do the shoulder rotations, so you will want to make sure your back stays soft
and flat. Watch for tension in other places. I seemed to carry tension in my
thumbs so I worked on keeping them soft. When your friend is testing by pushing
on your arm, have her or him watch to see if you have tension in other places.
Some people got tight in their necks or jaws. The reason
we went through the pickup in such detail was to learn how to access our core
strength so that we could do the single rein pickup and have stability without
tension. Alex said that one reason she worked on this was that when she watched
me do the single rein work, I had the mechanics, but my arms did not seem to be
accessing the core strength in the rest of my body. There was a disconnect
there, and she wanted to show us how to make the single rein pickup something we
did with our whole bodies, and not just a movement isolated to the arms.
But we are
not done yet. As the last part, she had me pick up the second rein. I had
gotten in the habit of allowing my inside hand to move slightly up as I brought
the outside rein across. She wanted me to keep my inside hand way down and bring
the outside rein to it. We had worked on this on my ride on Saturday and I was
having difficulty getting the outside rein to my inside hand without moving it
at all. But it is really quite simple. I think I had unconsciously thought I
was not allowed to move my elbow on my outside hand, so I was twisting through
my torso to get my hand far enough across. Alex showed me how I could just bring
my whole arm across from my shoulder (without collapsing) and lay the bite of
the rein over my inside hand so I could pick it up with my thumb and forefinger.
Then I just slide along the top of the rein to reset my buckle hand and then end
up with my inside hand low and my outside hand up. We
actually spent about 5 hours on Sunday morning working on this with different
people taking turns on the house horses. There is an amazing amount of detail
and coordination involved in getting a pickup that has the correct rotations and
is still smooth and flowing. The question, of course, is does all this really
matter and do you have to spend hours sitting and perfecting your single and two
rein pickups? I think the answer is that it does matter, but no you don’t have
to perfect it. There are a few really important pieces that you need to have.
One is the ability to stabilize the inside hand down. Keeping that inside hand
stable is really important for teaching a horse about giving to the bit because
without that hand acting as a post, the horse will continue to brace and pull.
And I think you should start to be aware of the rotations and experiment with
that so you can explore it when you are riding. I would
suggest that you practice enough to get the feel for the pickup and transfer to
two reins. Then go ride your horse and see how it goes. At some point, you will
realize that there are places where there is room for improvement. So then you
go back and look at the pickup and make a change, and see if it helps. When you
and your horse are first learning, the small details might not matter because
you are just getting a rough approximation of the work. As your horse gets more
responsive and you both get better balance, making small adjustments in your
hand positions are going to matter. In the long run, having all the details in
place will help any horse learn faster from the very beginning, but when you are
both learning, I think it is easy to get caught up in too many details and it is
more important to get out there and try it on the horse and let the horse show
you what details matter for him at this time. If you
have already been doing SRR for a while, you might be reluctant to change your
rein pickup, or wondering why Alex has changed it. I can only guess here, but
there have been a few recurring themes at the last few Groton clinics. One is
that Alex has been working really hard to get riders to keep their inside hands
down. When I first learned SRR, the inside hand is stabilized down to ask the
horse for a give. As my horses got lighter and lighter, the point of contact
became higher (before I reached the side of the horse) and I ended up riding
with both hands elevated. Last year, she started working on getting me to ride
with my inside hand lower. This was hard because I seemed to reach the point of
contact before my hand was in the low position. In the old pickup, I would lift
my buckle hand midway, and then slide down the inside rein, so when I reached
the point of contact, my hand was still in the air. By starting both hands at
once, my inside hand starts lower and then ends lower. This of
course, begs the question, if my horse understands about gives, why does it
matter if my inside hand is so low? Well, Alex pointed out that it gives you a
good leverage point for controlling the shoulders. In previous SRR, the
connection to the jaw and hip was obvious and direct, but the connection to the
shoulders was a little trickier. With the inside hand down and the rotation in
the outside hand, I can now connect directly to the shoulders. In addition, I
am now more aware of my buckle hand. Sometimes in SRR, it is hard to remember
to keep that outside hand alive. By making it more active (with its own rotation
and out to the side a bit), you can keep a better awareness of the outside
hand. Now that I
think about it, it seems to me that this modified rein pickup is setting the
rider up for “riding on the triangle” which is what Alex calls it when you are
riding in that inside hand down/outside hand up with a connection between the
two hands position. That would be in contrast to riding on a “pure” single
rein or riding on a single rein with the buckle hand up and alive, but maybe not
very active. We spent
Sunday afternoon riding and working on rein mechanics. Several riders worked on
going from walk to trot and using the power of the inside hand down to help
stabilize the horse and help them carry the bend and softness through the
transition. We saw some real progress and the horses got lighter and lighter.
Alex also had the riders work on organizing the horse in the walk, asking for a
trot and then releasing the reins to ask the horse to stretch his neck out.
Once the horse was moving in the new longer frame, she would ask them to
reorganize the horse again. One question was if the horse kept the same cadence
even when the rein was released? She was checking to see if the horse inverted
or sped up. In
addition to the riding work, we had a few newer attendees working on ground work
with Kate and Lin’s lesson horses. Arlene and Sue worked on the mechanics of
WWYLM and 3 flip 3 on the ground and then moved on to learning the basics of
single rein riding. Kim Cassidy brought her young horse Oisin and Alex helped
Kim learn how to settle Oisin down in a new place. One interesting piece from
watching them was that when he came out in his halter he was much better than
when he was in his bridle. He turned out to be a bit of a worrier and it showed
up more when he was bridled, so we got to see the progression of using head
lowering, the pre-WWYLM game and magic hand to help him connect to Kim and work
in a more relaxed manner. By Sunday afternoon, he was doing really well. Monday the
roofers arrived! Lin’s barn and indoor were scheduled to get a new roof,
starting on Monday morning. None of us were sure what would happen. Maybe it
would rain and they wouldn’t come, maybe they would be late, maybe it would be
quiet enough that we could use the outdoor. We left our options open but I
learned early Monday AM that it was going to be an interesting day. When the
roofers arrived, Rosie went crazy and had to be taken out of the barn. I don’t
blame her, being in a strange place and suddenly hearing the roof being pulled
off. I came up right away from where I was spending the night and found Lin
holding her out on the grass. So Rosie and I spent part of the morning grazing
in the side yard, watching the roofers and allowing her to get her composure
back. Once she
was a little settled, I took her and turned her out in the outdoor ring. She has
a favorite corner to stand in, and I hoped she would settle down. Alex came out
and helped me get her brain engaged by targeting our hands and it was nice to
see how that activity settled her down enough that we were able to sit down in
the grass by the corner and she remained calm. Arlene asked what we were doing
and Alex replied that we were being Rosie’s herd. I really liked that
description because that was what we were doing, just keeping her company so
that it was not so scary and offering her opportunities to earn reinforcement.
I was
amazed to see that Lin’s horses really didn’t care about the roofers and Arlene
saddled up Button and Alex gave her a lesson in the round pen. When the roofers
took their lunch break, Rosie and I worked in the outdoor ring. Alex had us work
on picking up the second rein and stabilizing my inside hand down so that Rosie
had to step up into the rein instead of drifting in or out. I think I finally
started to understand how I could use the sliding of the inside hand down and
outside hand up as a reset to rebalance her through her shoulders, get her to
soften, and step up into the bridle all at once. I could feel some very definite
weight shifts and adjustments in her balance just by focusing on connecting my
hand position to my core and the rest of my body. This is one place where the
rotation of the outside hand made a big difference, especially on the right
where she tends to pop her shoulder and drift out a bit. That small adjustment
in my position helped her keep her balance. I left
after my lesson so I don’t know how the rest of the afternoon went, but Alex was
starting to work with Kate and Tucson on going forward, so the roofers hadn’t
slowed them down at all. Even with the roofers, it had been a great weekend and
I certainly went home with enough ideas to keep me busy until the next clinic in
October. If you
have questions about the work I described here, I can go into more detail. Some
of it is easy to show in person, but hard to describe in words, so if something
doesn’t make sense, please ask. Katie
Bartlett Elverson,
Pa.
http://www.equineclickertraining.com additional
note (September 2006). I have now been experimenting with both ways of doing the
single rein pickup on one of my horses. What I have found is that I use both. It
depends upon my horse's alignment and what I am trying to accomplish through the
single rein pickup. Lifting the buckle hand to my chest works well when I am
just starting new horses and I don't want the horse to feel at all trapped
between two reins. It also works well for an advanced horse that is well aligned
from the nose through the shoulders. If I have a horse that understands about
gives but is a big wiggly in front or I am doing work where I need precise
control of the shoulders, I find I do the rein pickup where my buckle hand is
rotated and out to the side. This is just my first impression after playing with
the variations.
A clinic report: AK
Advanced Clinic at Groton, NY: October 2006
Last
weekend was the last Alexandra Kurland clinic at
We started
off the weekend catching up and had some good discussions about how clicker
training incorporates many tools, and we need to recognize that our job is to
communicate effectively with the horse. This relates back to some recent
threads about whip use, etc.. Alex pointed out that she uses a whip on the
ground as an arm extender and she uses the whip under saddle in the same way.
It is part of her cueing system and she does not want to abandon it just because
the perception is that whip use under saddle is an implied threat. I am
bringing this up because I am going to come back to this idea later when I talk
about how we use the reins. It is really important to be able to separate out
our emotional response to a tool, based of past experience in the traditional
horse world, so that we can use all of the tools available to us, but with the
clicker mindset.
I do not
think this is easy. I rode Rosie all summer with a whip. I systematically
introduced the whip under saddle, rewarded her for correct responses and made
sure I never escalated with the whip or used it out of frustration. Rosie is not
afraid of the whip and I can swing it around, use it to flick flies, itch her
belly, etc.. But, I have to say that I would rather not ride with a whip. Part
of me still believes that if I need the whip, there is something lacking in my
own horsemanship. It doesn’t matter if that is true or not, I am just writing
this to show that it is REALLY hard for me to let go of my original perception
of a whip.
One way to
help think about this is that to some horses the presence of the whip can be
part of the cue, even if you don’t use it. Arlene’s horse will trot off readily
if she is carrying a whip, but not if she is not. Is the horse scared of the
whip? Probably not, the horse has just learned that when Arlene is carrying a
whip and says “trot,” uses her legs (whatever), trot might be the right answer.
One summer I taught Rosie that if I had a ground pole in the RP, cantering was a
rewardable option. I had used the pole to get the departure and once she was
good at it, I realized that I didn’t have to send her over the pole, or ask over
the pole. All I had to do was drag the pole in and say “canter” with a whip
cue. The pole in the RP was part of her cue to canter. It was actually pretty
funny.
Alex
wanted to do some videotaping for her new DVD’s so we got to have a little bit
of show and tell over the weekend. Kate Graham showed off Lucky’s liberty work
and we all enjoyed that. He will do lateral work next to her at liberty and
canter alongside her while she walks. He has had some time off for an injury
and it was fun to see how happy he was to be back in work.
Other than
Lucky’s liberty work, this was a riding clinic. In the past, we have spent time
on rein mechanics and body work and other awareness exercises. This weekend we
just jumped right in to the riding. I think Alex felt we were at the point
where we could explore the rein mechanics under saddle and let the horses tell
us how we were doing. I am just going to list a few of the key points that she
covered through the whole weekend. Some of the points listed come from an on
horse demo that Alex did for us on Sunday AM. She rode and showed us the correct
mechanics and some of the common errors. I hope she will put this session on a
DVD as it was very informative.
Basic
Single Rein Riding: Things to evaluate/check as you do the work
1. Is your position becoming static? How often are you releasing? A
static position in SRR comes out of waiting too long for a give. In the
beginning, riders are not sure what is a give, so they tend to stabilize too
long while waiting for a response from the horse. Once they recognize a give, it
is easier to find the rhythm of asking and releasing. But there seems to be
another stage where the rider tends to get static. This is when the horse has
some basic training in SRR and is getting soft and the rider is waiting for the
next piece, whether it is elevation, moving the shoulders or another piece.
Again, the rider is waiting for the response and gets stuck. In this situation,
the rider has to keep asking for many gives. If you keep releasing and asking
for gives, you will get enough variation to be able to pick out the new piece
you want. This is the clickable moment. The horse is more likely to give you
something new if you keep giving him opportunities to start over. Otherwise you
both get stuck. There are
two other things I want to write about. One is dealing with anticipation and the
other is teaching a horse to release forward into the rein.
Anticipation
came up a lot this weekend because several of the horses are now doing quite a
bit of trot work. In the past, if the horse anticipated something, we would
either gently disallow it, or go with it, and start slowly adding in stimulus
control. In general, this works quite well. If my horse offers a give, or
shoulder-in or something before I am ready, it is no big deal. The trot is a
bit different. I think there are several things that come into play here. Most
of us don’t want our horses to trot without asking, for safety reasons, and also
because it is often a sign of tension or stress. There is also the issue of if
the horse trots off and we are not ready, we might not be balanced and prepared
and the horse might get discouraged from trotting if every time he goes, the
rider has to scramble to get organized. So, we do want trotting under stimulus
control. But, some of these horses were just learning to get organized in the
trot and were sometimes offering these really gorgeous and balanced trots.
Because of the quality of the trots and because they were learning to release
their backs to go up into the trot, Alex was reluctant to have us disallow the
trot. But then it got very confusing. When do you go with the trot, and when do
you stop the horse?
In
the course of our discussion, a few good guidelines came out. Case 1: If
the horse just trots off when you are actively working on something else (walk
etc..), then you can disallow the trot. The horse might be trotting to avoid
doing something else, or out of confusion. If you find the horse is trotting
when you are not prepared, then you can shut the trot down.
Case 2: If
you are setting the horse up for the trot, and he trots off early, but it is
beautiful, you can allow it. In this case, you have to make some decisions. The
horse is probably using part of your setup as the cue to trot, is this ok?
Case 3:
the horse is consistently offering a good trot and you are ready to put it on
stimulus control. In this case, you know that you can probably get the good trot
when you want it, and that if you disallow it once, the horse will probably
still offer it when you ask. To be honest, I think most of us just sort of get
to this point without really working at it. If you are being selective about
which trots you will click, you will start to recognize when the horse is not
going to have a good trot even before he gets all the way into the trot, and you
will already be disallowing those. As the horse learns to recognize when you
will allow the trot, trotting will be coming under stimulus control.
Case 4:
you are in a situation where you don’t want the trot at all and you disallow it.
This might be in a new place or with a new rider, or even at some stage in you
ride. I am very consistent about not allowing Rosie to trot off until l have
gone through some beginning of the ride warm-up exercises. If she trots before we
have done a series of exercises, I disallow it. Over time, she has learned not
to offer trot until I am done with them. In general, what I have found with her
is that she will not offer trot unless it has already been reinforced in that
session. So, once I have rewarded trot, it is on her list of possible choices
when I ask for something.
I do find
that if the horse is consistently offering trot when you don’t want it, that you
might have to go through a stage of disallowing any unrequested trot. In this
case, you have to be very consistent and then you can start to allow some
flexibility. With some horses, stimulus control is more of an issue than with
others.
Ok. But I
haven’t answered the question. How do you disallow the trot? This was an area of
some confusion. If you are on one rein, you take the hip by sliding down and
lifting the inside hand. If you are on two reins, Alex has you lift the outside
hand and lower the inside hand. You are going to slide your hands apart so you
find the point of contact on both upper and lower hands. If you slide them and
there is slack, you will probably not a slack. In this case, you might have to
spread your hands apart more. This shuts down the trot without blocking it and
it does not seem to upset horses.
The
challenge is that sometimes the horse trots when the rider is in transition
between one rein and two and the inside hand goes up when it should go down and
vice versa. Alex pointed out that if you are on two reins and you do inside
hand up, outside hand down (the opposite of her suggested inside hand
down/outside hand up), it is very unpleasant for the horse. She said it does
nasty things to their spine. I didn’t get a chance to ask her about it, but in
thinking, I have to assume that it is related to the bend that the horse is in.
If the horse is bent to the inside and you do inside hand down/outside hand up,
you are asking the horse to stop within the bend. If you do inside hand
up/outside hand down, you are twisting the horse’s neck and spine. You can do
inside hand up on one rein because the outside rein is allowing the hips to
swing and the horse is not trapped between the two reins.
Which
leads nicely into my lesson. I did not do Single Rein Riding over the weekend,
except in my warm-up and some steering at the trot. I had what Alex calls the
“human side rein” lesson. I am going to describe what we did and then how it
relates to SRR. It is really the same principle as SRR, but because I was on
two reins, used evenly, it took me a while to process what I was doing, how it
fit into the process and why it was consistent with the rest of Alex’s work. I
am still processing and exploring this, so bear with me.
On
Saturday, Alex had me warm up Rosie and just trot her around the outside arena,
working on school figures and patterns. We would do a circle, to a diagonal,
down the long side to a turn etc.. .We haven’t worked on duration at the trot
much at these clinics and Alex wanted to see where I was with Rosie. I had
mentioned that Rosie seems to get stuck in patterns and I had been working on
making her more flexible and responsive so that I could ride various figures and
she would flow through them.
One thing
Alex noted was that she was not sure Rosie was stepping up into the outside
rein. I had spent a lot of time this summer teaching Rosie to lengthen her frame
and stretch out and she is actually pretty good at lengthening her frame without
speeding up or falling on her forehand. This is a hard lesson for her. She has a
lot of push from behind and when I first started it, she would push herself on
to her forehand and then lose her balance and run. A good way to test the
connection to the outside rein is to ride turns off the outside rein where
instead of closing the outside rein against the neck to get the turn, you
actually open it out away from the shoulder. The horse has to rock back a little
and lift the shoulders up and over. When you turn by closing the outsider rein
against the neck, you are blocking the shoulders. When you turn by using the
inside rein, you are pulling the shoulders around. It is a different feeling. I
had noticed at home that Rosie will do this turn going right, but not going
left, so there was something going on there.
The other
thing Alex noticed was that while I had taught Rosie to stretch forward and
down, Rosie was not really allowing me to find the point of contact out in
front. She tended to back off whenever I took a feel of her mouth. In my
previous work on getting her to stretch, I had put slack in the reins and then
sent her forward, so she wouldn’t be confused by hands saying “stop” and legs
saying “go.” But what she needed to learn that when I sent her forward evenly
into both reins, the way to find the release was to go forward and release
forward. OK, what? I found this pretty confusing. It was way too similar to the
riding the horse forward into a fixed hand, which I did not like. I have had
teachers that had me hold my hands steady and send the horse up into it. I have
done this and you can get a horse to soften and round by putting them between
your hand and leg. But it always felt a little jammed to me and I wasn’t sure I
wanted to go there.
But I
could see that Rosie did need to learn to go forward even when I was asking for
something with the rein so I continued. And this is when the light bulb came on
for me. In one of Alex’s tapes, she talks about getting baby gives. A give is
when the body part comes alive with energy and moves in the direction you ask.
There are 6 directions (left, right, up, down, forward, and back). Rosie had
learned left, right, up, down, and back. She had not learned forward. I had
taught head lowering where she followed the release down, but I had not taught
her to follow the contact out and down. Is this a question of semantics? No, I
don’t think so. When Rosie started to reach for the bit, allow me to find the
point of contact and then stretch out more to find the release, if felt
different. There was no feeling of being trapped. In fact, I could feel her
back swing and her gaits got bigger. But it was hard work. She could only do it
for little while before she started to slow down.
Once I had
her more connected and looking for the release out front, she filled out the
reins and I suddenly found that I could use the outside rein for turns in both
directions. Alex had me riding diagonal to diagonal and I could just keep my
inside hand low, open the outside hand a bit, (or lift it a bit) and she just
flowed through the turn with the same bend and energy.
I rode the
same lesson (with slight variations) all three days and by day 3, my horse had a
more active walk and felt much more connected. So then I had to think about
things. I initially thought this was not a single rein riding lesson. But then
I realized that in order to stabilize my hand and allow Rosie to find the
contact forward, I had to use both reins. If I had used only one rein, she would
have kept offering the 5 other directions that she knew (left, right, up, down
and back). So I had to change my hand position so she knew I was looking for
something else. The lesson was entirely consistent with SRR.
It was
important that I stabilized using my whole body, but not by locking my hands. It
is easy to do this exercise and lock your elbows. Alex wanted my arms in full
extension, but soft. She had me hold my hands on the edge of my saddle so I
could monitor their position and make sure that my reins were even. I would
start by asking Rosie to walk forward and then I would slide my hands out to the
side until I could feel the corners of her mouth. Once I found the point of
contact, I would ask for more energy. If she took a little stronger feel and
walked up into my hands, I would release and allow her to lengthen her neck.
Then I would find the point of contact again and repeat so that I was slowly
inching her out, but she had to allow me to reconnect with her as I did it.
This is an
important point, and goes back to my earlier discussion about whips. Even
though I have done a lot of SRR and try not to use the reins to slow down or
stop a horse by pulling back evenly, I still do it sometimes (tsk, tsk). And
somewhere in my brain, increased pressure on the reins has meanings that come
from my past experience. If the horse does it, it is pulling. If I do it, it
means I want the horse to stop. So, I had to really say to myself that when I
take a feel of her mouth with both reins, it is the same as in SRR. It is just
going to the point of contact and saying ‘I want something.” Rosie’s job is to
figure out what I want. If she backs off, I just say “no, that wasn’t it,” and
add energy, exactly as I would if I was asking for a give to the side. The rein
does not mean stop.
What
happened was that Rosie learned that if I used both hands and added energy and
my body position/posture etc.. was saying go forward, that those things combined
meant that the release was to be found by going forward and reaching out with
her neck and releasing her spine. And she did figure it out. The difference
between this and what I had been previously taught was that when she took a
little feel and released her spine forward, I released too. It might be just a
softening of my hand, but I allow her to soften and drop “on to the bit.” In
order for her discover it, I had to allow that slight feeling of “pull’ and
desire to go forward. This is a fine line. I don’t want her pulling me down, but
I do want her asking is forward the answer. If I reward or release for that
initial little pull (sense of stronger connection), it makes things clearer for
her.
I would
also like to add that I had to readjust my thinking a bit. When I had previously
down some “long and low” work with Rosie, I had stabilized my hands if she
flipped the bend or inverted. I hate to admit it but I was thinking of it as
saying “no, you are here.” Actually this was pretty effective and maybe it is
appropriate for starting this work. But when I was the human side reins, if
Rosie put slack in the reins by getting crooked or shortening her neck, I would
slide my hands out until I reconnected and the thought here was “here I am, come
find me again.” What is the difference? The difference is that when she put
slack in the line by slowing, I did not just send her forward, I actually
shortened my reins until I could feel her mouth and started again. What I was
teaching her was that she could not drop the connection. This is a different
feeling and one worth thinking about because it is part of what allows us to
feel connected to a horse even when we are riding on a float or a softer rein.
I am going
into detail over this not because I expect you all to run out and ride this
lesson, but because I think it addresses so many of the issues that keep
cropping up on the lists. Horses that are overbent, curled etc.. are ones that
have not had this lesson yet.. This is how single rein riding ties in with and
leads to a performance horse that is ridden on two reins. And I want
to bring up another point. I asked Alex if I needed to do this lesson on Rosie
because I had done something wrong. Maybe I had let her get too curled, maybe I
had not concentrated enough on forward or…. Her response was that it is a tough
lesson and she thought that it would have been premature to do it on Rosie
before now. I felt relieved and had to go think about it. So, this is my take
on it. Ask yourself as you sit on your green and perhaps anxious young horse. Do
you want to teach your horse to find the release by going forward? With some
horses, this might just teach them to run. The point of this lesson is to teach
the horse to release the spine forward. The horse cannot release the spine and
carry himself unless he has developed sufficient coordination and strength to
carry himself correctly in that longer frame. I have played around with these
kinds of exercises before but never felt that Rosie had the coordination or
physical ability to do it. And I didn’t know exactly what I was looking for.
Alex has
said to me that she uses many of the same rein effects, exercises and lessons
that are found in more traditional dressage. What she finds is that she does
them in a different order. Many trainers start off with this “go forward into
the contact” lesson as the first lesson. And sometimes it works out, but often
you end up with the rider who is sending the horse forward and holding back at
the same time because there is not enough strength, balance, and understanding
of the release.
Well, this
is getting way too long, but I have to add one final note. I could recognize the
release that Alex was looking for because in my work playing with the pose, I
did discover that I can sometimes get Willy to rock back, elevate and then
stretch without falling forward. This is the same feeling as what I was going
for with Rosie. I tried to take pictures of Willy posing, but you don’t see it
in the pictures. It is a feeling, a sense of muscles and energy flowing.
Hopefully
I have given you all food for thought. As always, I encourage you to get to an
Alex clinic if you can. We welcome new people at
A Clinic Report: Advanced Clicker Clinic
with Alexandra Kurland: April 21-23 in Groton, NY Hi
everyone, Last
weekend I attended the advanced clinic with Alexandra Kurland that was held at
Lin Sweeney’s farm in Groton NY. We had wonderful weather and it was great to
see how everyone made it through the winter and what they had been working on.
There is a core group of 6-8 horses and riders who have been attending these
clinics since 2001 and it is so nice to see the progress and changes in both
trainer skills and the horse’s balance and development. Because
this was a large group, we spent all our time working horses instead of the
usual mix of horses and tai chi/bodywork/rope handling. And there was quite a
wide range of behaviors that the horses were working on. Usually a “theme”
emerges from these clinics and I initially thought that this clinic was more of
an overview and look at the progression of single rein riding. But upon further
reflection, I think it was more than that. What it really showed was how to use
the “tools” that Alex has taught us, putting them to work to solve training
problems, and then there was some fine tuning and looking at the next step too. This is
really taking Alex’s work to the next level. In previous clinics, there has been
a lot of focus on learning the mechanics of single rein riding and the sequence
of behaviors that one asks for to do WWYLM, 3 flip 3, HSS and so on. In this
clinic, most of the people who were working horses were familiar with the lesson
they were using, but now learning how to use a lesson to connect with their
horse or improve his performance. A side benefit of this was that the new
people in the audience got a nice overview of how to ride the exercises and a
real sense of how they fit into the training progression. There were
a few really good examples of this. One of the horses was a bit grumpy on the
first day. He has had a little clicker work but was being handled by a new
person and had been trailered in, so he was in a new place too. Instead of
working on what they had originally intended, Alex and Sue worked with him on
head lowering as that was what he needed on that day. Sue got a chance to
practice and improve her head lowering skills while the horse learned to calm
down and settle. They made a huge amount of progress over the 2 days and by
Sunday he clearly understood head lowering and could keep his head down with
some duration. Another
horse was also being handled by a different person and when she first got on and
rode, there was a lack of communication between Button and Arlene about when
Arlene wanted her to go forward. Button is Lin’s horse who she generously
allows clinic attendees to use if they cannot bring their own. Arlene and Button
have done beautiful groundwork in the past, but on Saturday when Arlene got on,
Button was stuck and would not move. Perhaps she was not sure of what Arlene
wanted or just not connected enough (to Arlene) to figure it out, but Alex had
Arlene just work on gives to the bit to release Button into motion. The idea was
to ask for a give of the jaw and connect it to movement of a front leg. Alex
refers to this as using marionette strings and the idea is that you can really
connect the pickup of the rein to the horse moving a foot in any direction. It
was fascinating to watch this connection being built. At one point Button had
clearly figured out that the click was coming when she moved her left front foot
so she just offered picking it up and holding it. Another
important piece that came out of Arlene’s session was the idea that it was
important for Arlene and Button to figure this out without being in a hurry.
Each of our horses learn the way we ride and if we want to be consistent, it is
important that we each ride in a way that we are comfortable with. When I was
learning to ride as a kid, I was constantly told to be tougher with the horses
and make sure they knew I was boss. I think this is a pretty common attitude
among horse people and I did learn to be more assertive, which is probably a
good thing in moderation(I was a very shy and timid child…). But, as I
got better at riding and learned more about horses, I found that there was only
a certain level of “assertiveness” with which I was comfortable. If I went
beyond that, I became inconsistent because I was going beyond my own comfort
level and so my response to the horse would vary depending upon how I was
feeling on any given day and other variables. And what I have found is that
being inconsistent is a real training problem. It is better to stay within your
own comfort zone and be consistent with the horse. If you can do that, you will
make progress as long as you keep focusing on what you want the horse to do. Along the
same idea of new horse and rider combinations and learning to use the toolbox in
new ways, we watched Lin ride Stormy. Stormy is an Anglo-Arab who regularly
attends clinics with his owner. I first met him a few years ago and he was a
very angry horse and uncomfortable in his body. Bev (and Kate Graham, who
teaches her) have done a wonderful job and he is now light and soft and doing
consistent trot work. On Saturday Bev rode him and on Sunday Lin rode him. It
was so interesting to see how he was not sure about Lin and wanted to invert and
get tense, but when Lin just consistently and quietly asked him to soften and
waited for him to release his back, he started to work well for her too. Lin
was able to take all the same skills she has learned on her own horse and tap
into the work that Bev had done with Stormy and connect with him within one
session. We had two
other riders who were working on the trot with their horses and starting to
explore how to use 3 flip 3 while trotting to get the horse to balance even
better and to change the geography of where they were riding (steering if you
will, but it was steering in balance, not just making the horse turn etc…).
Both these horses are interesting cases because they are gaited horses that are
now trotting with more and more balance. One of them has developed this
amazing big powerful trot and his rider was working on using the idea of 3 flip
3 at the trot to help him rebalance when he got quick. I should say that in
these horses, the trot was built out of 3 flip 3 so it is not that she was now
trotting and using 3 flip 3. It was more that she was using 3 flip 3 in a more
subtle way to improve the trot that had already been built with it. The other
horse is a Missouri Fox Trotter who was a confirmed pacer when I first met him.
His pace was very uncomfortable to ride and he didn’t seem to gait naturally so
his owner has been focusing on teaching him to trot. When I first met him, they
were just clicking any trot steps and he was still pacing a lot. When I saw him
last weekend, he barely paced at all and his trot is becoming round and soft.
She spent part of the weekend working on riding circles and asking him to move
off the line of the circle on to the diagonal so that she can start to put
school figures together. She used 3 flip 3 to put him on the circle and then
found the moment in 3 flip 3 when she could take him off the circle while
staying in balance. In
addition to learning to use Alex’s toolbox to improve the horse’s performance by
choosing appropriate exercises, there was another idea that we explored at the
clinic. That was the idea of using one behavior to reinforce another and how to
build chains so that the horse builds enthusiasm. On Saturday, Kate rode her
horse Lucky and Alex had her reinforce walking actively forward by asking him to
give to the bit and collect. The second behavior is one that he has been
heavily reinforced for and he loves to do. So rather than clicking the active
walk, Kate would ask him to collect and then click. The idea was to see if this
would allow Kate to work on two behaviors at once and maintain the energy of the
active walk into the collected walk. The benefit of doing it this way was that
she could reward the active walk without having to keep stopping him. It
worked very well and we could see a huge change in how he was carrying himself
and how much easier it was for Kate to keep his energy up. I played
with the same idea of using chains on Monday when I rode Rosie. My assignment
was to just ride and see if I could ask for multiple behaviors before clicking.
Because Rosie has not traveled a lot and tends to be anxious in new places, I
click at a pretty high reinforcement rate at the clinics. This strategy has
worked well and she has gotten comfortable and settled working at Lin’s barn.
At this clinic she was very calm so the idea was to ask for more behaviors
before I clicked. I rode a lot of the same patterns I had been working on at
home and she was able to remain focused and with me so that was great progress.
What I would like to explore now are ways to chain behaviors together and
heavily reinforce certain behaviors so that she remains enthusiastic through the
whole chain. In the
past, I have taken advantage of what Rosie wants to do on any given day and I
have heavily reinforced certain behaviors to improve them. Now I feel like I
have a better understanding of how I can combine the idea of making a behavior
highly reinforcing to her and the strategic use of that behavior in a chain to
increase enthusiasm and the quality of other behaviors without having to click
each one individually. This goes beyond the idea of only reinforcing a behavior
on a variable reinforcement schedule, but means I have to really think and plan
how to combine behaviors together so that she is not just hoping that eventually
she will get clicked, but that she wants to do one behavior well so she can do
the next one. There were
lots of good discussions at the clinic about how single rein riding helps horses
learn to find their own balance and how to view some of the phases that horses
go through as they learn this work. Alex did a little work with jaw flexions and
showed us how the jaw flexions could change the whole horse’s spine and we could
see changes all the way down in to Lucky’s stifles. It was a very informative
weekend and left me with a lot of food for thought. If you
have any questions, want clarification etc…, feel free to email me or the list.
I have not gone into a lot of technical stuff in this post because I wanted to
share a bigger picture of how this work comes together and what you can do with
it once you have an understanding of the basic exercises.
A Clinic Report:
Advanced Clicker Clinic with Alexandra Kurland: July 21-23 in Groton, NY Hi
everyone, Last
weekend's clinic with Alex in Groton, NY was a great one as usual. We had
pleasant weather and a nice mix of old and new people. I love seeing how
everyone has progressed and meeting new people. I think that those of us who
have been clicker training for a while sometimes forget how amazing this work
is, and it is nice to see and hear the enthusiasm from new members of the
group. The main focus of the clinic was on riding, but we did spend a bit of
time on round pen work and walking through how to set up shoulder-in.
Because I
have already written so much about single rein riding, I am not going to go the
basics here, but instead I am going to share some fine tuning and details that
Alex worked on. I will say that we did hear "inside hand down" a lot. Each
clinic with Alex clarifies some detail about single rein riding and the
progression from one rein to two, and this time we focused a lot on the use of
the "triangle" and building the connection between both hands that leads to an
understanding of how to use the outside rein. This is something that we have
been exploring and working on for quite some time, but it is an ongoing process
and there were some new details that made a significant difference. When Alex
teaches single rein riding, the emphasis in the beginning is on sliding down the
inside rein and asking the horse to give. The outside hand is lifting the buckle
as part of the mechanics of sliding, but that hand is not active on its own. It
is working in conjunction with the inside hand to set the horse up to ask for a
give. You can use the outside hand to adjust the inside rein by lifting it to
allow the rein to slide through the inside hand and shorten the distance from
the inside hand to the bit. This is a useful way to reset the point of contact
if the horse puts slack in the rein by inverting or moving its head and neck in
an undesirable way. But, most of the focus is on stabilizing the inside hand. In past
clinics we have explored picking up the outside rein once the horse is soft, and
then using the outside rein to ask the horse to step over and under it, or to
turn away from it. Once you get the idea and the horse understands about the
outside rein, this is a nice feeling and it leads to a very light and balanced
horse that is also very adjustable. It is important to remember that the while
single rein riding is a valuable exercise in itself, one of the goals of single
rein riding is to use it to educate horse and rider so you can make the
progression to riding on two reins. A lot of traditional riding starts on two
reins, but Alex has found that by starting on one rein and slowly building up to
two reins, she can break down the teaching process into small steps. This
avoids a lot of the pulling, inverting, and feeling trapped that can happen when
you try to organize a horse on two reins and the horse doesn't know how to do
it. In
addition, the inside and outside reins have different functions and it is often
easier for the horse if they are taught separately so that the horse really
understands what each rein aid asks. Otherwise you can end up with a horse that
sort of bounces from one rein to the other or gets stuck between them, instead
of one that balances between them. So while it might seem like a long
complicated process to teach all about the inside rein and all about the outside
rein, you end up with a different connection to the horse in the end.
But, back
to the clinic. The first day was a mix of groundwork and riding, giving Alex a
chance to see where everyone was and what we needed to work on. I was an
auditor at this clinic so I got to watch all the lessons, which was a nice
change from spending a big part of the day hand grazing Rosie. Alex worked on
basic mechanics of how to start a young horse on giving his hip and with some of
the riding horses, she started to explain more about what to do when you pick up
the outside rein. It is not uncommon for riders to spend so much time on the
single rein work that by the time they go to two reins, they are not sure what
to do with the second rein. How to make this transition became a big focus of
the clinic, both for people who were already on two reins and for those people
just starting to go to two reins. And then there was the question of once you
are on two reins, what do you do next? The way
Alex helps people and horses make the transition from one to two reins is
through the use of "the triangle." When you do single rein riding, your inside
hand slides down and stabilizes and your outside hand lifts up. If you look at
the line of the reins, there is a triangle where one side is from the bit to the
inside hand, the next side is between your inside and outside hand, and the
third side is from your outside hand back to the bit. In previous single rein
sessions, we have focused on the position of the inside hand and what happens
when we move the outside hand up or out. This time Alex focused on line between
your two hands and wanted riders to explore what happens when they take the
slack out of the line between their hands. This is done by moving the outside
hand up or out, depending upon what the horse needs. Before I
go farther, I want to clarify something. The transition from one rein to two is
a gradual transition and there are times when I am not sure if I am really on
one rein or on two because I might be in that phase of my training where I am
starting to activate the outside rein, but I have not completely switched to two
reins. Alex gave us a clear and simple rule which was if there is slack between
your two hands and you use your outside hand by sliding up or out, you are on
two reins because you are changing the connection between the outside hand and
the bit when you do so. Remember, this is if there is SLACK between your two
hands. If there is NO SLACK between the two hands, then you are still on a
single rein, with the outside hand supporting the inside hand and you are still
in single rein riding mode. The reason
this makes a difference is because single rein riding is all about asking for a
change and then releasing. You do not want to ride around with tension in the
reins. You ask for a give and then release. If you get stuck and the horse does
not respond, then you need to re-evaluate how you are setting things up because
one of the benefits of single rein riding is that the horse does not feel forced
or trapped. Therefore,
there are stages in single rein riding where different uses of the triangle are
appropriate. When you first start asking for baby gives, you are going to slide
down and stabilize your inside hand. If the horse really pulls, you are going to
use your other hand to help the inside hand hold its position. As the horse
gets softer and you start working on the hip, you are going to start exploring
the use of the part of the triangle that is between your two hands. If you take
the slack out when your horse is drifting through its outside shoulder, what
happens? If you take the slack out when the horse wants to drift in, what
happens? Part of
the reason to start working on the connection between your two hands is to start
teaching the rider about using both sides of her body. We had a little session
on Sunday morning when Alex sat on a bench and showed the rein mechanics and the
difference between having slack and no slack between her two hands. As soon as
she took the slack out of her outside hand, her whole body position opened up
and stabilized. If someone acted as the horse and moved the bit in different
ways, she was very solid. By taking the slack out, the rider is able to feel
more stable and connected but it has nothing to do with using the horse's mouth
for balance or stability. It was at this session that the term "soggy triangle"
was coined. So, if Alex tells you your triangle is getting soggy, it means you
need to take the slack out between your two hands. Various
horse and rider combination explored this farther throughout the weekend. Kate
learned how to use the triangle to keep Lucky on the rail and get him to step up
and under the outside rein as a set-up for shoulder-in. Lin learned how to use
the triangle to help her young horse stay connected through his hips instead of
drifting. Sue learned how to use it as an effective way to complete a turn
instead of being tempted to use a bit of opening inside rein. In all these
cases, the use of the triangle allowed the rider to connect to the horse's hips
by helping the horse either step up and under when it got out of alignment or
add engagement when it got strung out. The use of
the triangle helps riders connect to their horses hips under saddle, but we also
explored other ways to connect to the hips. One of the horses at the clinic had
not traveled much and she was overwhelmed by the people, sound system and being
in the ring on her own. On Saturday, her owner (Margaret) spent time working on
HSS (hip shoulder shoulder) and getting her to give her hips and soften, but she
was still too overwhelmed. So Alex had her set the mare free and the owner
walked a pattern around the cones, clicking the mare (Meadowlark) for coming up
to her or for walking quietly. This was a
good exercise and a nice one to balance out much of the weekend's work which was
focused on pressure and release. Because Margaret and Meadowlark had a strong
relationship, Alex really wanted to give her time to choose to be with her
person. She might not have chosen the same exercise for a horse and owner that
were new to each other. It was really interesting to watch and see how the mare
was paying attention to what Margaret was doing, even though she was not ready
to come over. And it was nice to see her finally start to choose to stay with
her. An important point was that Alex did not allow Margaret to approach
Meadowlark, even to offer food after a click. She wanted her to extend her hand
and offer the food, but not walk over to her or try to lure her with the food.
If Meadowlark refused to come over, then she just put it away and moved on.
Alex kept saying "don't beg." This really struck a chord with me because I
have had times when Rosie has refused food and it is so tempting to try and keep
pushing it at her. It is better to just offer and then move on. When the horse
is ready, she will take it. On Sunday,
Margaret was able to practice HSS with Meadowlark which gave her another way to
redirect Meadowlark's energy if she gets upset. Once they were into the HSS
pattern, they both visibly relaxed and started to reconnect with each other.
When I first wrote that, I wrote that Meadowlark relaxed and connected with
Margaret, but actually it worked both ways. The repetitive pattern of HSS
settled both of them down and Meadowlark even started offering head lowering. It
was nice to end her session with some nice relaxation and softness. Connecting
to the hip came up in other ways, we had some people doing groundwork sessions
where they learned to connect to the hip. This can be a tricky thing and it
takes some timing to set the horse up to offer the hip and be able to translate
that into the lateral movement that comes out of the second half of 3flip3.
Alex also showed us other ways to get to the hip. In one groundwork session, she
started the handler in grown-ups are talking which evolved into ground-tying and
then drawing the hip around. Once the horse was softly bringing his hip around,
the handler could take that into forward motion or back it up. In another
session, Alex had the rider work on giving the hip at the halt to get a horse to
understand more about moving off her leg. This led
to an interesting session with one rider and side discussions about how riders
need to go with the horse's motion but not get caught up by the side to side
sway of the horse's barrel or hips. Getting caught up in the side to side sway
of the hips can lead to the rider "sloshing" from side to side and this actually
makes a horse less forward and puts the rider out of synch with the forward
motion of the horse. Alex talked about how teaching a horse to give his hip at
the halt and then using that step to get forward motion presents a nice
opportunity to add the leg aid as the horse steps off. This teaches the horse
about the leg aid in a gentle way and helps the rider find the correct timing.
In a
session on Sunday AM, Alex has us walk through the set-up for shoulder-in as two
person horses to get a feel for how the horse needs to rotate into shoulder-in
and how the rider can help set it up. She had us walk a half turn and reverse
where the return to the wall incorporated some lateral steps so that the horse's
hip reached the wall before (or at the same time as) the shoulders. If the hip
is really stepping up and under like that, the wall acts to redirect the flow of
the movement and it is very easy for the rider to rotate the horse into
shoulder-in. I have
played with this set-up a bit since I came home and I really like it. It
eliminates some of the confusion that comes from setting shoulder-in up from a
circle or out of a corner, where drifting can be a problem. It also gives the
horse a clear pattern to follow so that some of the usual confusion over whether
you want a turn or shoulder-in can be avoided, at least in the beginning stages.
As an interesting side note, Alex started working shoulder-in with one horse
that came out and seemed a bit unbalanced, and there were questions about
whether he was having trouble with the footing, or was sore, or just not getting
organized. They worked on shoulder-in at the walk and at the end of his session,
he trotted off fine.
Shoulder-in was one of the options Alex presented for what to do once you have
your horse organized on two reins. Some of the riders had spent a lot of time
teaching their horses to soften, bend and carry themselves on one rein and were
now making the transition to two reins. But once they were on two reins, they
were not sure what to do next. Exploring shoulder-in was a nice way to
experiment with changes in the horse's alignment and learn about using the
outside rein. Alex had other riders work on riding school figures such as figure
8's or doing transitions. It was
nice to see how much progress everyone had made and to see the new people get an
understanding of how the work develops. I thought we had a really nice variety
of people at different levels and it is always fun to see how all the work
connects together and how much the horses enjoy it. You can see it in how they
carry themselves and their bright expressions and eagerness. I can't believe
it is 6 months until the next one. See you in April!
Alexandra
Kurland Advanced Clinic: July 19-21, 2008 Hi
everyone, I think
Arlene, Sue and Margaret have done a wonderful job of describing the
micro-riding that Alex had us do at the July Groton clinic. I agree that body
awareness and the power of thought are huge and that Alex has come up with a
very effective and simple way of teaching people about this. Since my
name keeps coming up as the “official Groton clinic reporter,” I will add my
comments to what has already been said. The post numbers refer to messages
on "the_click_that_teaches yahoo list." You can read these (and the rest
of the thread) on that list, or if you are not a member, click on the links and
you can read a copy that I have put on my site. If you are
not familiar with micro-riding, you might want to go and read Alex’s first post
(5056)
and second post (5346)
on micro-riding. She is using the term “micro-riding” to refer to riding where
instead of working on gross body movements, the rider puts her awareness on what
is going on inside her own body and explores connecting that to what the horse
is doing, or uses it to suggest to the horse what she wants him or her to do.
Alex introduces the idea by having people work in groups off the horses. One
person stands and goes through the sequence of accessing body parts and a second
person acts as a monitor. This person supplies feedback by placing a hand and
reporting on what they can feel as the rider makes changes. It is often helpful
to have a third person as an observer to add any comments about what they see
from the outside. The monitor sometimes finds it is easier to work with her eyes
closed, and often the rider does too. So it is good to have someone that is
there with their eyes open! The first
time I experienced micro-riding was at the Groton clinic in April and Alex
describes the process completely in post 5056. We started with learning to move
our shoulders and then worked down to our femur and bubbling spring. If you
are not familiar with the “bubbling spring,” it is a point on the bottom of the
foot right behind the ball of your foot. I first saw it described by Sally
Swift in Centered Riding. She says the term in used in acupuncture and the
easiest way to find it is to palpate the bottom of your foot. The spot is the
intersection of the longitudinal and lateral balance lines of your foot. To find
it, she says “You will find the point of intersection about two to three inches
behind the big joint of the second toe in a soft part of the foot.” Martial
arts use it as a both an energy and grounding point. This
clinic built from what we started at the April clinic. Alex had has us start by
warming up our shoulders, asking us to move them up, down, in and out. In the
beginning, it is ok to feel as if you are doing big movements. As you develop
more connection and awareness of moving your shoulders, you can make the
movement smaller and smaller. This was one interesting part of the clinic
because as people got better and better at connecting to body parts, they got
quieter and quieter. For the audience, it became a real lesson in noticing tiny
changes in posture and alignment, which is an important skill in itself. I also
want to point out that, in the beginning, people took a breath as they accessed
each new body part. As they got more comfortable with the steps, they could do
larger chains in one breath. THE
GROUNDING CHAIN The
shoulders are the start of what Alex refers to as the “grounding chain.” The
grounding chain starts with the shoulders and moves down to the bubbling
spring. We worked through the chain until we could easily move down through our
bodies building awareness and feeling better alignment. The sequence was as
follows: Shoulders:
once they were warmed up, the phrase Alex liked to use was to keep the shoulders
“free and easy.” The easiest way I found to do this was to breathe into my
shoulders and just let them settle down gently. Rib cage:
expand your rib cage to the side with a breath
Thigh/Femur: think of rotating your thigh slightly in or out. Alex found that
rotating the thigh out made it easier to access the rest of the lower leg. As
you do this, you might feel some changes in your pelvis which means you are
already starting to connect your own body pieces together so allow that to
happen. If it doesn’t, that is fine too. Remember this is a thought. You don’t
have to actually move your leg although you can start there if it is helpful.
Lower leg:
think of rotating it slightly out. Often the lower leg and thigh/femur operate
together in the beginning so don’t worry if you can’t do each one independently. Bubbling
spring: think of being centered over your bubbling spring, with energy coming up
through it. We had some interesting responses to accessing the bubbling spring.
Some people felt energy shoot up and it made them feel energized and more
powerful. Other people felt like accessing the bubbling spring made them feel
more grounded, aware of how they were standing and more firmly rooted. I worked
with one person who felt energy in one leg and grounding in the other. We all
have little habit patterns and most people prefer to carry slightly more weight
over one leg than the other, so it is understandable that each leg might have a
different sensation. We
practiced this the first day and spent time learning to go through the chain
smoothly. People discovered the importance of breathing and allowing the
awareness to happen instead of physically trying to move the body part. I
think it is important to take time to build the focus and awareness that is
necessary to work through this sequence. In the beginning, we found it was
helpful to access each body part by taking a new breath. Over time, we found
that we could do it in fewer breaths because we could work through the sequence
faster, not by rushing, but because the next one was already there and we could
just flow through the sequence instead of having to stop and think about each
new part. THE HEAD
CIRCUIT After the
grounding circuit, Alex had us explore the “head circuit.” The head circuit
includes:
The back of the heart: This is
the space on your back between your shoulder blades. I find I can access it by
thinking about breathing into my rib cage and allowing the air to expand that
space so that I feel a fullness or expanding across the top of my back. My
shoulder blades slide easily a bit to the side to allow this to happen. I find
I sometimes have a tendency to round my shoulders when I first try to access the
back of the heart, but thinking about the breathing helps me to use the back of
the heart to open my whole chest instead of curving it in.
The collarbone gates or “Chi
Who.” James Shaw has a good description of the “Chi Who.” Sometimes Alex
introduces these here, or she might wait until later. The collarbone gates are
those points on the front of your collarbone pretty close to your midline. Alex
has us find them by extending our arms out to the side and then bending them at
the elbows to bring our thumbs to touch our chests (easier to show than
describe). If you stick your thumbs up (like hitchhikers) as you bring your
arms in, your thumbs will be pretty close to a little depression (one on each
side) right along your collar bone. That is your “Chi who.” The tongue
on the roof of the mouth: In the beginning, Alex had us think about putting the
middle of the tongue on the roof of our mouth. As we got better at it, we
didn’t have to physically move our tongue, but could just think it. What I
noticed watching people in the early stages when they were still doing larger
movements was that people tended to lengthen their necks a bit as they moved
their tongue up. Later on there was just a feeling of allowing oneself to get a
little lift. The
release of the poll: This just the feeling of opening up at the back of the
head. Alex talked about Sally Swift’s image of opening the blue sky at the back
of the neck. I found it easiest to think about taking the feel from lifting the
tongue and then letting myself relax a bit, not by allowing myself to squash
back down but by releasing any tension I might have added when I thought about
being taller. The top of
the head: This was just having some awareness of the top of your head. We did
talk about how it would feel if you had a string connected to the top of your
head and lifting it up. I don’t think you want the idea of being pulled up and
hanging, but more the idea of holding up the weight of your own head so it is
not just stuck on top of your neck, but is floating above it, holding itself up,
but without tension. Arlene
brought up the image of a horse pricking its ears and this was a useful image
for many of us when we worked on the head circuit because it incorporated the
lift and the feeling of interest and energy. This is as
far as we got Saturday morning and the riders explored how it felt in their
rides in the afternoon. Some of the horses responded right away. One of the
riders said that her horse was more forward than usual when she thought of the
head circuit. This rider was also noticeably quieter when she was thinking
about the micro-riding and a lot of the extra body motion that sometimes crept
in was decreased. Another horse was a bit confused at first when the rider
started doing things differently and it took them a few minutes to sort it out.
I do think that if your horse is already very tuned in to your small body
movements, you have to allow some time for both of you to explore how to use the
micro-riding so you are not throwing too many new things at your horse at once. THE
DIAPHRAGHM CIRCUIT On Sunday,
Alex added the next piece which was what I think she called the “diaphragm
circuit.” It is helpful to have names for these so that when riding, she can
ask the rider to think of a specific sequence. The diaphragm circuit includes: The front
of the Diaphragm: This is just continuing the circle so that you feel like the
energy comes all the way around and picks you up a bit. Alex had Lin play with
this quite a lot and the image she used was to have Lin think about generating
an energy ball which she could then send in any direction she wanted. She could
send the energy ball forward to ask the horse to go forward. When Lin tried
this, the observers on the other side of the room said they could feel it.
Middle of
Diaphragm (if needed): some people find this helpful to add a feeling of flow
and continuity to the diaphragm circuit. Back of
the Diaphragm: Take that feeling of expanding your torso down into your
diaphragm. If you don’t know where your diaphragm is or what it looks like, I
suggest you find a picture. It will help. Personally, I found that visualizing
the bones or muscles themselves moving was helpful when I was trying to figure
out how to find my own body parts. Alex suggested thinking about filling the
lower back to access the back of the diaphragm. Top of
Pelvic floor: I think most of us found that the back of the diaphragm led
directly into a change in our hips or pelvis. For me, there was a feeling of
lightening the pelvic floor and allowing the energy coming down my back to
circle around toward the front which led to … And back
to the Front of the Diaphragm to complete the circuit. Just from
watching people, I thought that adding in this sequence changed people’s
alignment and balance in significant ways. It was interesting to watch because
it was a series of tiny shifts that all added up. Each one alone didn’t seem
significant but it paved the way for the next one and so on. Have you
ever had someone try to change something major about your riding position?
What I have felt and seen is that the instructor looks for the most obvious
problem and changes that one detail. In one way, this makes sense because most
of us can only think about making one major adjustment at a time. But of
course, every body part is connected, so even though the instructor thinks they
are only asking you to focus on one body part, the rider has to not only change
that part, but figure out how to use the rest of his body in conjunction with
the new position, which ends up meaning that the rider now has to deal with
major changes in a number of body parts at once. With the
micro-riding, the changes were small and because the adjustments were built in
chains, there was an element of allowing the body to do its own self-correcting.
If the shoulders were shifted slightly one way, which then affected the pelvis,
the necessary change to the pelvis was picked up later down in the chain. The
rider didn’t have to do both things at once, but neither did the rider change
one thing and leave something else out of balance. As we did
this work, Alex had a few comments which I will share. She is finding there
are lots of advantages to this work and is getting a lot of positive feedback.
One thing she likes is that people are building focus and awareness. People
might start out only able to access one body part, but by the end of the
weekend, they are doing whole chains on one breath. I have not mentioned it,
but Alex did mix targeting in with the micro-riding. Not only did it give people
a break (concentrating on this work is hard), but it helped them learn to switch
from internal awareness to external. This is an important skill for riders who
need to be in touch with their own bodies and also paying attention to what the
horse is doing, the environment, other riders and who knows what else (screaming
or using the ring as a sandbox children, come to mind, but maybe that is just me
<smile>.) We need to be able to switch from internal focus to external focus
easily and quickly. She puts a
lot of importance on the relaxation of the shoulders and the ability to rotate
your thighs. If your shoulders are tight, it restricts your breathing and leads
to tension. If your thighs are tight, it restricts the movement of your pelvis
and affects your ability to follow and direct the energy of the horse. By
concentrating on doing this at the level of thought instead of the level of
movement, people don’t get caught up in the cycle of “trying too hard” where
they end up making things worse by doing too much. As soon as you realize how
powerful your thought can be, a lot of extra “body noise” disappears. The rides
on Sunday afternoon were about exploring the micro-riding while doing some basic
single rein exercises. People were very excited at how much better the horses
were responding (softer, lighter, more energetic) when they thought about
micro-riding. Some of the people who attend the Groton clinics use Kate and
Lin’s horses so they are riding horses they know, but they are not as familiar
and connected to them as their own horses. I thought it was interesting that the
micro-riding worked well both for people on their own horses and for these other
combinations. THE CEREAL
BOX On Monday,
Alex added the “cereal box” image to the micro-riding. Once the rider had worked
through her grounding, head and energy/diaphragm circuits, Alex had her
visualize a box suspended over her torso. She had Lin think of the 4 points that
held up the bottom of the box and how it connected to her shoulders. Did it have
diagonal bracing? How wide was it? How was it suspended? The idea is to think
of keeping the box stable, no twisting or collapsing. When I did this, I found
that the image of the cereal box helped to adjust any sight forward or backward
tilt that might have crept in during the rest of the micro-riding. It was a nice
check of whether or not the assembled alignment needed any final tweaking.
The last
thing we explored in the house was adding in some rein mechanics. What happens
when you pick up the reins in a single rein pickup? Can you pick up the reins as
you go through the grounding sequence? Does it feel different? Alex said that
one of her mantras from the trip to England was that single rein riding is not
single hand riding. She wants riders using both hands and connecting them to
the torso. She talked about the importance of feeling like you were riding from
your core. Using the rein mechanics while being aware of the grounding circuit
sent the connection from your hands through your whole body. We looked
at the rein mechanics when asking for lateral flexions and what happens when the
inside hand is down vs. up. When people first learn lateral work, there is a
real tendency for the inside hand to sneak up. Alex had Lin feel the changes in
her body when she had her inside hand down and thought about asking the horse to
step sideways. Then she had her lift her inside hand up and do the same thing
and Lin reported that it was a totally different feeling. I tried it
and thought that when my inside hand was down, it was easier to shift my weight
a bit to the outside to suggest the horse step over AND I stayed more grounded.
If I let my inside hand come up, then I tended to feel more like I was leaning
and pulling the horse to the outside. This was just a brief look at one rein
mechanic but I think that practicing some of the rein mechanics with this new
body awareness and ability to access specific body parts could be very helpful
if a rider was having difficulty with certain things under saddle. During the
rides on Monday, we worked on using micro-riding to work through a sticky point
in our training. Arlene has already described how she used micro-riding to get
Button’s energy up and get forward movement. The change in Arlene’s ability to
ride Button over the weekend was really astounding and it was so nice to see the
two of them connect. Sue was able to ask Tucson for forward and soft which he
had not been able to do before. Kate put it all together to work on doing some
lateral movements around cones and Lucky had some really nice moments where Kate
was able to use micro-riding to ask for changes of bend and alignment from
shoulder-in to haunches-in. In addition, Kate has taught Lucky to wait and then
come to the mounting block when she calls. This time she set up a jump and he
jumped it on the way to the mounting block. She also showed us Lucky’s liberty
work which is so much fun to watch.
A clinic report: AK
Intermediate/Advanced Clinic in Elverson, Pa: Sept 2008
On September 20-21, I hosted a clinic with Alexandra Kurland at my farm in
Elverson, Pa. For the past few years, I have been working with a
group of local horse owners who are interested in clicker training. Some
of them had attended clinics with Alex in the past, but others had not and I
thought hosting a clinic with Alex would give everyone an opportunity to work
with her. I really do think that if you are serious about clicker
training, it is worth going to a clinic with a recognized clicker trainer or at
least working with other people who are clicker training their own horses.
Having a support network is important and seeing various horses in various
stages of clicker training is very educational. The clinic was held
at my farm and we somehow managed to get great weather, juggle horses around
successfully and we all had a great time. We started on Friday
night with an informal get-together so Alex could meet the clinic attendees and
get a feel for what we might want to cover over the course of the weekend.
I had cleared out some space in the loft of my husband's tractor barn and this
became known as "the clicker clubhouse." It turned out to be a great space
to meet and work. The temperature was ok, there were no flies and we were
only occasionally visited by unexpected guests. Clicker training is so much fun
that some of my children and even the dog visited to see what was going on. Saturday morning we
had a brief meeting to introduce the remaining clinic attendees and then we
started working horses. We worked in my outdoor ring and most people spent
Saturday on groundwork. We had a few horses that were new to traveling so
time was spent on some of Alex's favorite basic exercises. One of
them is to set up a circle of cones and walk from cone to cone, asking the horse
to give his or her hip and turn around the cone. Getting control of the
hip is an important step in the progression toward teaching lateral flexions and
is also very important for safety on the ground. In addition to
having control of the hips, backing is an important skill and Alex worked on
this with most of the horses. One of the things that came up at this
clinic was the importance of the tai chi wall and how to use it without force.
Alex talked about how the tai chi wall is introduced on the ground, but also is
used as part of the triangle in riding. With one horse that
was a bit anxious and wanted to barge past his handler, Alex combined head
lowering with giving the hip to help get better control. This horse wanted
to barge past his handler and while she could ask him for head lowering, that
didn't help once she allowed him to move. And while, she could get his
hip, it was a bit awkward and he was not settling down. Watching this
horse work showed how head lowering is an important first step in teaching a
horse emotional control and gets the handler control of the horse when he is
stationary. But it also showed how head lowering was not enough to defuse
this horse's energy and allow him to walk off nicely. So Alex started by
asking the horse for head lowering (which he knew and could do) and built a
chain from that behavior until he was walking forward calmly. By setting up a
specific pattern, Alex made it easier for the handler to maintain a nice
connection to the horse and the routine of the pattern made the lesson easier
for the horse. The "goal" was to practice walking off casually and have
the horse follow calmly. Alex taught this by having the handler ask for
head lowering. When he lowered his head and stabilized there, she could
either release, click or allow him to walk forward. All three acted as
reinforcers and she could offer two reinforcers at once if she wanted. She could
click and release or release and allow him to walk forward. Since he wanted to
move, creating the chain of head lowering to walking forward worked nicely to
show him that if he was quiet for a moment, his reward was being allowed to walk
off. If he barged forward when she walked off, then she asked him to give his
hips and back up (HSS) and drop his head. If he walked off nicely, she clicked
right away after only one or two steps, and before he could get going too fast.
After working this pattern for a while, there was a clear change in the handlers
smoothness and control and the horse became much calmer. The cone circle was
also used for some early single rein riding lessons. Riding around the cones is
a good way to get connected to the horse's hips and start to get some lateral
movement. We had two riders who practiced their single rein mechanics and worked
on the early steps of getting their horses to give their hips, soften and bend
around the cones. The cones give both horse and rider focus, and help
riders identify when the horse is giving the hip. Getting a feel for
movement in the horse's hips is a piece that is often difficult for riders new
to single rein riding. If you have never paid attention to what your
horse's hips are doing, it is hard to know what it feels like when a horse steps
up and under, and clicking the right moment is even harder. If a rider is
struggling with feeling the hip move, I find it often helps to come up with
others ways of determining when the horse has given his hip by identifying
behaviors that accompany the hip or indicate that the horse must have just
stepped under correctly. One way to identify
when the horse has given his hip is if you get a change in geography. If you are
coming around the cone on an arc of a specific shape and you ask for a give and
the horse changes direction so he is now pointing to the inside of your previous
path (at any angle, the size of a hip give can vary a lot), then he must have
stepped under and around to do it. In the early stages, clicking this change in
direction will be enough to get the horse moving his hips a bit. With some
horses, the reason you can't feel the hips very well is that they don't move
them very clearly, especially if they are stiff. So just getting the horse doing
turns and moving in various circular patterns loosens things up enough for the
rider to start to identify what it feels like when the horse steps under behind.
One of the horses tended to drift in her front end, so as the rider slid down
the rein and asked for a turn, the horse would bend her neck to the inside but
drift out. With that horse, an absence of this drift meant that the horse had
given her hip and she could identify this because she got what felt like a
cleaner turn. In her case, there was also a change in geography but it was
marked by her ability to stay on her chosen path. For my ride on Rosie,
Alex had me work on getting a better walk. By the time I went, it was getting
warm and the flies were out and Rosie was in the mood to do her favorite sluggy
walk. This is something that I have worked on at various times, but while I have
often made some progress, we had not quite gotten to the point where a more
energetic walk was freely offered, and while Rosie will walk energetically
forward on a loose rein, we lose some of that energy when I pick up the reins.
In the clinic report from October 2006, I talked about teaching Rosie to march
along and release forward into the contact. This lesson was a follow up to that.
Rosie had learned to stretch forward into the rein and march along and for a
while, I was very conscientious about working on it, but this behavior had faded
over time and while I could still get her to march along when I asked for more
energy, she backed off as soon as I started to gather the reins. Alex wanted her
to keep that energy and forward feel through the rein pickup. I think in earlier
sessions, Rosie had figured out that I wanted her to take the bit out and
forward when we are walking in a long and energetic frame, but I had not figured
out how to have this same feeling through the transition and into a more
collected walk. Alex had me lower and
spread my hands wide until I found the point of contact with Rosie's mouth (yes,
both reins at once). Alex sometimes calls this "the human side-reins"
lesson. Then I asked Rosie to march along and when she accepted the feel
in my hand AND kept marching forward, I was to click and release. This is
hard for horses and can generate all sorts of interesting behaviors. When I
first worked on this back in 2006, I had a period where I had taught my horse to
pull and I had to go back and teach her the distinction between when I was
allowing her to step up and take my hands forward and when I set a firm point of
contact and wanted her to soften there. This is an important step in
teaching a horse to follow the feel in your hands and connect it to what you are
doing with the rest of your body, but it is not easy to do. By the end of my ride
Rosie was clearly interpreting the spreading of my hands as a cue to march up
and forward and was walking with more energy. I mixed in some trot and canter
work to help keep her thinking forward and to give her a break. I think that
walked forward with energy is more tiring to her than cantering around the ring.
In addition to this, I have to say that I was pleased that Rosie handled the
invasion of her own personal riding ring by chairs and people quite well. She
hates it when I rearrange things out there and inspects every little
modification before she will go past it easily but perhaps the clinic setup
looked familiar to her from all those times at Groton. The other point I
want to make about the morning's sessions and really about the whole weekend, is
that when you have a lot of new horses in one clinic, you get a chance to see
how the foundation behaviors are used together to come up with training
sequences that work to address any handler's and horse's combination of needs.
With many of the horses, they were focusing on one exercise but mixed in other
foundation behaviors. Even if the person was working on backing, she might add
Grown-ups Are Talking between requests to back or add in head lowering or parts
of the duct tape lessons. Saturday afternoon we
worked on rein mechanics, a review of the foundation behaviors and a little
micro-riding. Alex reviewed Grown-ups are Talking and how this exercise
starts with free shaping before she teaches the horse about the lead that
happens when the handler activates the lead rope. One of
the phrases she used during the morning sessions was telling the handler to
"walk off casually." But what does this mean and why do it?
The usual set-up is that the handler is standing in Grown-ups are Talking
position and then quietly walks forward, so that the contact on the lead
changes, but the contact changes just as function of the person stepping
forward, without any additional movement by the handler. The idea is for
the horse to learn to follow the feel of the lead without adding the
complication of the handler learning rein mechanics. This step is the
beginning of what Alex calls "activating the lead rope." You can do
the same thing with backing by just turning and walking into the horse's space
and clicking the horse for stepping backwards. Alex demonstrated
this with people and this led into a good discussion of how to use the tai chi
wall, full arm extensions and how to check for blockages in your body.
Alex was able to get Laurie to back up, both by extending her arm forward, and
by wiggling her toes. In the tai chi wall, the full arm extension and
straight line between the two hands allows the handler to find a position of
mechanical advantage and stability, and then release any tension in her body so
that the horse moves back, not because it is pushed back, but because going
forward is not an option. This whole idea of finding a point of stability
and releasing to allow the horse to respond came up a few times over the course
of the weekend. Alex's groundwork and single rein riding is based on
the idea of finding the point of contact and waiting for the horse to respond.
But the handler needs to be able to find the point of contact and quietly wait,
because any tension or blocking in the handler's body prevents development of
feel and communication between her and the horse. Sunday morning Alex
spent some time explaining the content of each of her DVD's. I think
she wanted people to know what was on each DVD, and she also wanted people to
understand how the DVD's are connected together. She pointed out that the
DVD's showed the development of clicker training and were a great map of how far
clicker training has come. It was very interesting to hear her
describe how each DVD evolved out of a clinic situation or some work she was
doing with her own horses. Then we worked on
micro-riding. Micro-riding has been described in previous clinic notes from this
year so I am not going to do into it in detail here. The emphasis in this clinic
was on letting everyone experience micro-riding and then exploring the
connection between micro-riding and rein mechanics. We worked in small
groups and did the grounding circuit (shoulders down into thigh and bubbling
spring). Then we did some rein mechanics, working on sliding down and
stabilizing the point of contact. Alex worked with Dawn and had her
slide to the point of contact, stabilize and then when Alex (as the horse)
accepted the point of contact, Dawn released her shoulders and Alex softened so
Dawn could release the rein. They did this a few times and then Alex went
on and worked with other groups and I worked with Dawn. This was very
interesting for me because it mattered a lot when Dawn thought about releasing.
If Dawn released in her body (not the rein) as I was testing to see if she was
stable, then I thought "ah-ha, I can pull her," but if she released after I met
the point of contact, then her release of tension prompted me to soften, a
behavior that she rewarded by releasing the rein. Timing matters, and this
exercise showed me that there were many levels of release. Dawn could
release tension in her body to help the horse soften and release, and she could
do that while maintaining the stable point of contact that told the horse she
was looking for a change on his part. It was a nice illustration of the
connection between micro-riding and the rein mechanics. Sunday afternoon was
more riding and groundwork sessions. Most of the horses continued to work
on the same exercises from Saturday, smoothing out some of the rough spots that
were remaining and getting more fluid about giving the hip and staying with the
handler. One of the horses had been very settled on Saturday but was anxious on
Sunday so her handler got to work on using the tai chi wall to reset her mare
and stop her barging. Alex took a few of the horses to clarify a few
details and this was very helpful for both handlers and the audience. Some of
this work can feel awkward and a bit too much like constantly correcting the
horse in the early stages, but Alex showed how it could be done smoothly and
with lack of force. Alex and I continued
to work on Rosie's walk and this time she was starting to show some changes in
the quality of her walk. Instead of just feeling like she was pushing
forward into the contact, she started to get some bounce in her step and use
herself more actively. Since she was starting to figure out how to keep
the energy up but not direct it all forward, it was easier to pick her up
without her slowing down. Alex had me work on picking her up in little steps, so
instead of lifting the buckle hand all the way up and sliding down, I just
lifted it a little and asked for her to come up a little, released and then
asked again. This allowed me to bring her up slowly without losing energy
and without her getting overbent in her neck. I was very pleased with the
change in her self-carriage at the walk and with the whole weekend. It was
another successful Alex clinic. Here are a few
pictures from the clinic: A rider is working the cone circle and
Rosie walking forward with energy. A little crabby while passing the new
horse, but still marching.
Alex working on Grown-ups with Festi
A clinic report: AK
Advanced Clinic in Groton, NY: October 2008
The last Groton
clinic for the year was held on a beautiful October weekend. In addition to the
regular group. we were lucky to have Hilary and Charlotte visiting from the UK
and they added some new perspective and enthusiasm to the group. Charlotte
wrote up some wonderful notes for this clinic, so I am going to share them
instead of a regular clinic report, but I do want to include a few tidbits from
my perspective. Every clinic seems to
end up with a focus and at this one we spent a lot of time on micro-riding, HSS
(hip, shoulder, shoulder) and the power of resets. We started off
with some micro-riding so that everyone had a chance to experience it. Some of
the attendees had heard about micro-riding, but not actually gotten a chance to
do it with a partner. Saturday morning we reviewed the grounding
circuit and got the new people up to speed. Those people familiar with
micro-riding were experimenting the rest of the circuits and then looking at the interaction between the rider and
the monitor and comparing this to the rider/horse relationship. There were some nice
images about how information is passed back and forth initially as big requests
and responses and how, over time, these become finer and more detailed and there
is a steady flow of information instead of packets of information separated by
gaps. Over the course of
the weekend, the micro-riding brought up some interesting points. When we
added the crown and diaphragm circuits, Alex talked about how you should be
able to move through quickly enough that you don't belabor each step. The idea
is to feel the energy flow. Once you are past the initial learning stages,
going too slow can allow the energy to get blocked and you don't build the connectedness
that you want. The grounding circuit makes the rider feel more connected
to the ground and provides a firm foundation so that when the rider goes to the
crown and diaphragm circuit, the rider can stretch up and add energy without
becoming unbalanced or crooked. If you linger too long on the grounding
circuit, you don't feel how you can channel the energy into other places. It turned out that working
through the circuits at the right speed was not always so easy. Sometimes
the monitor got ahead and sometimes the rider got ahead. Doesn't this sound like
riding? We found that practicing saying the names of each step in the chain led to a
better understanding of how to ride different horses. One group was paying
attention to how the words were spoken and this led to the idea of "consonant"
vs. "vowel" horses
(as determined by whether you emphasize the consonant or vowel sound in a word.) Consonant horses are those where you move along quickly
to keep the energy going. Vowel horses are those where you go a little more
slowly and draw the words out (emphasizing the vowels) to allow the horse to
relax and let energy flow gently instead of rushing. As people
got better at it, they did some experimenting. One group formed
a chain which started with one person in the middle who was monitored by two people, who
were in turn monitored by another person. This meant there were 4 people
connected to a
central person and when she activated the circuits, it radiated out to the
people on the ends. This had started when the group was exploring whether or not
people were using both sides of their bodies when they went through a circuit.
As riders, we need to be able to use one side independently, but we also need to
be symmetrical and able to use both sides equally. On a straight line, the
horse needs us to be symmetrical so he can line up underneath us. On a circle or
in lateral work, we may need to do one thing with one side of our body and
something else with the other. Looking at how people used each side
of their body also helped identify if someone was crooked or had a tendency to
overuse one side. There were other
variations and discoveries made with micro-riding over the weekend.
I found that micro-riding required the rider to know a lot about tone and
release. When was it necessary to add tone to access a body part? When was it
necessary to release to access a body part? Working on the ground in small
groups allowed people to learn things about their own bodies and what
they needed to do to access the circuits. Getting feedback from a monitor was
invaluable as the monitors could feel really tiny changes. I think this gave
people confidence to try this when riding, and to believe that the horses would
be able to feel these tiny changes. Taking micro-riding to the horses is
the next step and the work on the ground gives people the confidence to
experiment with the horses. If you are
experimenting with this and don't have a helper, you can still work on
micro-riding on your own. Going through the circuits and feeling the
changes in your own body will get you started. Then when you ride, you can do
the same thing and see how the horse responds. If I am playing with
something new, I will click the horse for any change the horse makes in response to my
micro-riding. I am aware that horses have to learn to tune out a certain
amount of what we do when we ride. Even with good riders, there is a certain
amount of "noise" and if the horse paid attention to every tiny nuance,
he
would be overloaded with information, so each horse does some selective listening.
When I try something new, my first job is to indicate to the horse that this is
a deliberate action on my part and I want him to pay attention to it. Then once
he is responding, I can start to evaluate more carefully what kind of responses
I want to reinforce. Sometimes the micro-riding produces immediate and
obvious changes and other times, it takes me a while to figure out how to
connect that piece to the horse. We didn't spend all
the time on micro-riding. We worked a lot on using resets and HSS (Hip shoulder
shoulder) to improve our horse's balance. The horses at this clinic
included some green horses just learning lateral flexions as well as some more advanced
horses. With the green horses, Alex worked on getting the horses soft but going
forward. This can be hard as many horses want to slow down when the rider asks
for something with the reins. Even with the advanced horses,
Alex spent time on getting the horses to move with energy both forward and
backward and to stay connected through the transitions. In addition, Alex
did some work on standing flexions and we all get to see Lucky's fun liberty
work and what Kate had been working on. She has Lucky putting together
some beautiful patterns with changes from shoulder-in to haunches-in and his
canter in-hand is getting better and better. We spent time on
Monday morning walking the HSS pattern. It is always worth walking the pattern
if you get confused. Alex stressed the importance of allowing some lateral
component in the exercise when the horse first learns to give its hip.
This will help prevent stalling out and leads to what she calls the "Gene Kelly
glide" where the horse flows back by stepping under with the inside shoulder and
rocking back. I really need to watch that movie so I have a better visual for
what she is talking about! In addition, she pointed out the importance of rocking the horse
back on to a substantial outside hind leg (through HSS) so the horse can step forward with energy into
the correct bend. These were just more little pieces of the puzzle on how
to get a good HSS. HSS is the basis for a reset so it is worth spending
time on it. A reset is what allows you to redirect and rebalance a horse when
they get quick or unorganized and it is a real key to understanding Alex's
methods for developing horses with great balance. Thanks to the work at
Alex's September clinic at my farm, Rosie's walk has improved tremendously and
Alex had me work on asking her to step back and come forward with energy. When
she got sticky about the backing, we focused on improving the backing. Alex had
me back and ask her to turn while backing, as if backing around a corner or on
an arc. Rosie was really sure that this was not possible, but we she did
get a few good steps where she changed orientation while backing and we are
continuing to work on it. As a side bonus, we
had a photographer come visit on Saturday. Her name is Vanessa Wright and
she was putting together a show called The Literary Horse. Her show
combines pictures of horses with quotes from all kinds of literature. She wanted
to feature Alex as one of the significant horse people of our time.
Her show opened in November and is traveling across the country. For more
information, you can go to
www.theliteraryhorse.com. If you have any questions
about the clinic, let me know. I have been brief because Charlotte has given me
permission to share her notes with everyone. So for this clinic report, we have
a "guest speaker," which is always fun because different people write down
different things and I think it's nice to have a fresh perspective.
Charlotte lives in the UK and posts regularly on the clickryder and click_that_teaches_lists. She has studied with Alex on Alex's trips to England
and came to the US to attend clinics in both Groton and Toutle. She is owned by
Tig and Loly and they are all enjoying clicker training.
Charlotte's Notes from Alex Kurland clinics – October 2008
Groton and Toutle Micro-Riding The order is: Shoulder blade-rib-top of thigh-thigh
out-lower leg-bubbling spring-back of heart-tongue-poll-head-lower jaw-front of
diaphragm-middle-back-lower back-pelvic floor-front of diaphragm. Start with asking for life and awareness
in the shoulder, then ask the rider to move it in each of the 4 directions.
Initially it might be a bit stiff, but often a couple of repetitions of up/down,
in/out can free it up sufficiently to move onto the next part. You don’t want
to aim for movement by rote or great big moves – there has to be an aliveness to
the feel. The micro-riding chain is like the chain set off when you pick up the
rein and ask for the horse’s jaw – how far through the body does the feel go?
Repetition will build the chain and create an automatic reaction so that the
whole body becomes alive when you pick up the rein. You can then play with other concepts
such as feeling what a transition is like, whether it’s the same with the same
rider but imagining different horses and also what turns are like. Also try playing with the rein pick up –
what does it feel like to pick up the reins? Try both imagining picking up the
reins and then compare to physically using reins – are they the same? Is it
connected and smooth? If not, what changes? Note that just as with the horse, if you
fail to access any part, balance is difficult to achieve. For example, if you
don’t move the ribs it can be hard to access the thighs or diaphragm. Similarly
the horse will be unable to access his hindquarters effectively if the ribs are
stuck. When performing lateral flexions in hand, if the horse twists, then the
jaw and poll will not be truly free. Micro-riding – get a baseline walk and
then play with the micro riding elements and see what happens! It is important
to get a good consistent baseline so that you can see what the effects of the
micro-riding may be happening. It is equally important to be able to return to
the baseline as and when you choose but take the time needed to get it back. Advanced in-hand work In- hand walk, trot and canter beside the
handler using ‘magic hands’, lengthen and shorten stride, shoulder-in and
haunches-in and the flow between them. Piaffe can be built by trotting slower
and slower in either shoulder-in or haunches-in or potentially halt to trot
in-hand asking the horse to rock forward out of the rock back. Its important to
choose the right moment so that the horse’s outside hind is on the ground and
ready to push forward. In-hand strengthening – by asking the
horse to raise and hold each leg in turn, it will strengthen the back (provided
the horse is already in carriage rather than ‘down’ in the back). Each piece
should be built separately, either free-shaping or using a knee target where the
horse targets his knee to the hand and this can then be lifted higher until the
leg is held aloft. This, combined with piaffe-type mobilisations can
effectively warm the horse up gently, especially for older stiffer horses or in
cold weather. The Value of Re-sets A large theme of the clinic was the
reset – balancing the weight shift forward and back lightens the horse’s
forehand and increases the weight-bearing capacity of the hindquarters. An
effective way to create these shifts is to use the shoulder-in combined with
rein-back. Can you ask your horse to move forward in shoulder-in, halt and then
re-set back into shoulder-in? Note that both the weight shift forward as well
as the one back is a clickable moment BUT be careful not to get stuck in a
sluggish backward slide; instead look for the feet to truly become unglued.
The outside hand is the important one in
this exercise – it is the one that communicates to the outside hind which is
where we want the horse to push off from, bending the joint and springing
forward. Eventually you are looking for the horse to rockback and then come
forward to a collected start – think micro-riding as you do this exercise, from
where could you instigate the halt and from how little a weight shift can you
create movement? The horse should be able to perform ‘willing, eager,
comfortable weight shifts.’ The exercise can then be developed
further to include:
·
Shoulder-in, halt, proceed in shoulder-in
·
Shoulder-in, halt, straighten out and reinback,
re-set in shoulder-in
·
Shoulder-in, halt, reinback in shoulder-in,
reset forward in shoulder-in The march needs to be equal forward and
back – think about walking back with your own feet. There should be a release
with every step both from the reins and from your body – as the horse goes back,
you may need to think forward with your hands in time with the feet. When stopping in shoulder-in, what do
you need to do to keep the shoulder-in whilst in halt? What elements of
micro-riding can you bring in? You’ll need this to be able to keep the balance
and walk off in a good shoulder-in position. This is different from halting,
its more of a ‘freeze frame’ in that the horse is balanced enough to stop at any
point in the stride. Another option for the re-set is to
develop backing in an arc – rather than going straight back, see whether you can
back around a square. This movement requires real sensitivity as it is easy to
oversteer or fail to set the horse up correctly – if the horse is bent to the
left for example, it will be very difficult to send the back end to the right.
Practice backing a square yourself – where does your weight go? Another exercise is to develop
shoulder-in on a square – this creates balance and softness. Its important to
really place the hips through the corners; use the outside rein if you lose
either the balance or the hind end. You’re aiming for the same cadence
throughout. Play with increasing the energy on the long side and decreasing on
the short. Riding on a triangle - 3 flip 3
and lateral flexions When riding on a triangle – get in, get
something, get out! Ride the basic cone pattern – around the
circle, then across the centre of the circle, round a cone and then back across
the cone and repeat. Use both the triangle and lateral flexions to help the
horse balance around the cones but be careful not to turn too tightly or the
forward energy will be killed. There needs to be a great deal of releases so
that forwards in maintained and also so that the horse does not lean on the
bridle. When riding on the triangle, the inside
hand must not go above the withers and each release must be complete, otherwise
there is a tendency to grab at the rein whilst leaving the outside hand up. If
you fail to stabilise the inside hand or slide the outside shoulder-blade down,
the hands can move too much which can encourage the horse to lean or fidget.
Your elbow needs to stay connected to your core – if you feel the horse leaning,
try opening the outside rein out but feel it out, don’t get fixed rigidly to
your side. If the horse has a more difficult side,
rather than working it to ‘fix’ it, visit the more difficult side briefly and
then return to the easier one which in itself will be a reinforcement.
Gradually the two sides will begin to balance out. When you pick up the triangle, ensure it
is up the midline and not out in front of the body since this not only
destabilises the seat but also can result in unstable hands. The inside hand
needs to be down at the shoulder, clear and consistent. As the flexion builds around the cones,
you can then move into 3 flip 3 when the balance is ready. It can help if the
index finger on the inside hand is pointed in the direction you wish the
shoulders to go. You’ll know when the balance is right, as the movement is
there for the taking. When riding 3 flip 3 into hip shoulder
shoulder, you are seeking to catch the hip, not force it. It is important to
pick the right point to ask for the hip – if you get it right, the horse will
glide over and back in the ‘Gene Kelly glide’. Don’t fall into the trap of
asking for it all at once – start with catching the hip, then attaining the
glide before finally asking for the full movement. The backward shift should
come from the balance and not from the reins. Each give and release softens the
jaw and works to unweight the inside shoulder – if the balance is right, you
can’t help but go back. As hip shoulder shoulder develops, it
begins to be almost straight line – the gives become more and more micro until
the horse will flex weight and balance the outside hind as a reset rather than a
grand give of the hip. Riding on 2 reins If you are widening your hands when on 2
reins, make sure that there is no backward traction. Also, the triangle remains
when you take up 2 reins with the inside hand lower than the outside and the
hands retaining their respective jobs. The cue to go forward is not the picking
up of the outside rein – the horse should be able to accept the rein pick-up at
any point and not associate it with moving forward. This is built in hip
shoulder shoulder on the ground so that when you move from one side to the
other, the horse does not associate picking up the rein with walking off. It is important when the horse offers
you 2 rein balance to organise the outside rein so that you can receive the
horse’s spine. If you do not handle it sensitively, the horse may lose its
balance. Only pick up 2 reins from a clickable moment. Why Would you Leave me And Hip
Shoulder Shoulder Its important to balance the desire to
move forward and around you with the ability to stand still – if the horse tends
to rush off after each click and treat, insert a pause using ‘adults are
talking’ so that the horse is able to wait before the handler asks him to do
something. If you are working a large horse, you
may find that by trying to put your hand on the wither actually blocks both
yourself and the horse from moving forward. Instead change the points of
contact so that you can get the bend around without compromising forward.
Remember when you ask the horse to come forward, it is with 2 hands – invite
with one and ask the horse to come around with the other. If the horse is so far back that you
have to reach to the shoulder, you’ll both get jammed up. Focus instead on
moving the horse forward – go to a point of contact and then lead. It may help
to walk off at a slight tangent to the circle if the horse finds it really
difficult to walk off freely. Play with the hand on the snap – lead forward and
come back to me – both hands need to be alive. During the initial stages, heavily
reinforce the balanced walk-off – you’ll do lots and lots of start ups. It is
up to the horse to find the balance, not for the handler to micro-manage. The
power if in the unfolding of the buckle hand – can the horse start to move off
so that your hands could unfold or are you blocked? By rewarding every
start-up
in correct balance, the horse will learn to balance in all orientations. When you work on wwylm at liberty, use
the target to create bend and position if they leave, but don’t keep it there
consistently. If the horse is not able to keep alongside you and bend around,
go back to using the target to get the horse to walk beside your thigh and then
in front and around. Note that before you ask the horse to come in and around,
you want the horse up and forward – if you do it too soon, they will fall onto
the inside and lean on their shoulders. If you ask for the horse to come up and
forward, you have a greater chance of keeping the shoulders upright and reaching
forward. Ask yourself whether the horse is
staying in his own space or coming on top of you. If the horse is trying to
overtake or charge forward, rather than using the lead to hold him back, use hip
shoulder shoulder. If the horse tries to change bend, either walk out or change
direction. From using the target, you can develop
‘magic hands’ where one hand holds the target and the other (buckle) hand sets
the perimeter of the circle on his shoulder. Eventually you could get to the
point where you can work at liberty using the magic hand on the horse’s shoulder
forward, back, at all gaits. Another way to develop magic hands is to
start walking with the horse and hold your hand up. If the horse stays, click
and treat but if they go, do nothing and wait for them to return. You will
gradually get to the point where the horse targets to your hand. The other
option might be to target standing still. If you are working in lateral flexions
all the time, you need an exit strategy – e.g. go to the mat, walk forward and so
on. When performing hip shoulder shoulder,
think about how far away from the cone you should start organising the rein and
the horse’s body so that they are set up correctly for the turn. Think about
‘good, better, best’ with the 3 gives of the jaw to catch the hip and create the
Gene Kelly glide. Although you should ensure there are many releases
throughout
the movement, don’t abandon the horse. Lateral Flexions in-hand Stand by the girth area and ask the
horse to give very very slightly to the bit – the most important thing to look
for is straightness of give, no twisting or leaning. Go to a point of contact
and wait for the horse to give to you – by standing at the shoulder area, you
can help keep the horse from bending around or leaning or stop him perceiving
your presence as driving him forward. If the horse curls around and you need
to reset him, lift the rein to straighten out the neck. If the horse moves,
stay with him but if there is too much movement, you could try transferring to a
smaller area. You can also use the food delivery to straighten the horse out.
Make sure the reins are even when you release them. Note that if you put lateral flexions in
a horse who already knows the post, it results in a more well-rounded ‘up’
expression. Matwork Get the horse balanced on the mat and
then ask for a yield of the hind end or front end whilst keeping the end on the
mat still. Matwork is all about ground tying – can
your horse stand on the mat whilst you walk off? Develop this in steps and if
the horse comes off, put him back on. Table Manners & Grownups If the horse is grabby, bring food down
between their nostrils – you are wanting the horse to use his muzzle to get the
food, not his teeth! If the horse is having trouble with
table manners, you need to be on your best t’ai chi behaviour when taking hold
of the halter or giving out treats. You may need to stabilise the horse’s head
to prevent him grabbing, but its important not to be jerky or rough yourself and
instead use bone rotations to gently take hold and stabilise his head. Overhand taking of the halter is less
directive – wait for the horse to relax and then release. The click can then be
even more powerful with its relaxation association. Note that the hand on the
halter also becomes a cue and lessens the grab for the treat. You also want the horse not to always
associate a hand on the nose with food. With grownups, you want to be able to
have the horse’s head where you want it – for example, at or equal to the wither
BUT remember that when you first teach grownups, it is freeshaped i.e. this is
before the rein has been activated. Once the rein has been activated for
leading and positioning, it is then fair to position the head during grownups
but not before. There are 2 types of grownups –
·
Handler slouching – click and treat for
relaxation
·
Handler in t’ai chi ‘up’ posture – click and
treat for posture in the horse Rein Handling It is very important that the top of the
triangle is solid, otherwise you will lose your seat and stability and release
your hands together, softly. Just because you have rope reins, don’t
fall into the pattern of grabbing; instead play with your fingers and close them
separately. Think flute, not baseball bat! When you close your hand around the
rein, its fingerPADs to your palm as opposed to fingerNAILs. As well as
practicing a complete pickup, see if you can perform a partial pickup with the
thumb and index finger. When picking up the reins, generate the
move from breathing into the shoulder blades – play with all directions to free
up the shoulders, up/down, in/out, circles etc. You need enough breath to
complete the cycle – the whole pickup of the rein is a complete cycle. The feel
of picking up reins this way is very different from initiating the move from the
elbow. Remember when you are corrected seated in the shoulders, you will be
stable and not easily moved. Other quotes
·
Don’t be passive, be responsive but not
reactive.
·
Don’t force it, feel it!
·
Test the feel of a circle in your body – how
accurately can you walk a circle? If you can’t walk one, how accurately can you
ride one?
·
The more you want to raise your hand, the more
you should probably put it down.
·
The horse needs to believe their withers are
going to move over.
·
Once you have lateral flexion and shoulder-in,
the rest of the horse’s life is about fine tuning it
·
Cues are very powerful – they establish really
quickly and are not used enough.
·
3 flip 3 is a balanced position in lateral
flexion from which you can access any gait in any direction.
·
Just because you are using positive
reinforcement, it doesn’t mean the animal is having a good time – at the start
you are a lumper, so the animal can get really confused. There’s not enough
feedback to make it clear for them. As we develop the ability to split down
behaviours, the horse becomes more confident.
·
At the point in training where you might want
to escalate pressure – add more steps.
·
If you can get a forward walk in the arena, you
truly have a forward cue, rather than the environment or other horses acting as
a cue.
·
Allow the movement all the way through your
body – when the horse is really trotting in balance, you need to allow it all
the way through to their mouth. If the reins are moving in a sine wave, then
the horse is truly through in its movement.
·
What is a cue? At what point do we want to
have it recognised by the horse? If you are in a different orientation or
position, can the horse still recognise the cues? What is really a cue for the
horse – is it the ‘hand wavy’ things or a shift in the abdominals for example?
·
You don’t have to do anything fast, but you do
have to do it promptly.
·
Its not about overcorrecting him, its about
helping him.
·
Use the food delivery to move the horse
around. This way you can minimise the use of the lead to position the horse and
avoid making him grumpy!
·
He doesn’t know how to get out of my way
– I have to play my part in the do-si-do.
·
I want to see a walk with the other gaits in
it.
·
Be careful not to click defensively – i.e. to
stop something happening.
·
Don’t block a good trot – its how you end up
with lame resentful and stiff horses. Redirect instead. However, you might
want to block a trot if the horse goes into it with a stiff spine.
·
You don’t just have to explain what the cue IS
but what its NOT.
Home |
Articles |
Clicker Basics |
Community |
FAQ |
Getting Started |
Horse Stories |
Links |
Photos |
Resources
|
||||


